TSA Server User Manual
Install a time stamp server on your own IIS web server, choose the certificate that signs the time stamps (a PFX file, the Windows certificate store, or a key kept in an HSM, a smart card or a USB token through PKCS#11) and use it from Adobe Acrobat, Windows code signing, Java, PowerShell, OpenSSL and any other RFC 3161 client.
1. What is TSA Server?
A time stamp proves that a piece of data existed at a given moment and that it has not been changed since. It is issued by a Time Stamping Authority (TSA): a service that receives the hash (the fingerprint) of the data, adds the current date and time, and signs the result with its own certificate. The signed result is the time stamp. The document itself never travels to the server, only its hash.
Time stamps are used with digital signatures. A signature made today stays verifiable after the signing certificate has expired, because the time stamp proves that the signature was made while the certificate was still valid.
TSA Server is a time stamping authority that runs as an application of Microsoft IIS. It works on most Windows web servers, so you do not need an extra machine. It answers the standard protocol RFC 3161 (used by Adobe Acrobat, OpenSSL, Java, signing libraries and many other programs) and also the older Authenticode time stamp requests (used by the Windows code signing tools), both at the same address.
The product contains:
| Part | What it does |
|---|---|
The time stamp service (get.aspx) | The address that the client programs use. It receives the requests and returns the time stamps. Optionally it accepts only users that you created (section 11). |
| The administration pages | Protected by an administrator account: the configuration, the choice of the time stamping certificate, the users, the audit trail and the registration (section 5). |
| Test pages | Time Stamp a File From Your Computer and Verify a Time Stamp Response File. |
| Three ways to keep the key | The private key of the time stamping certificate can be in a PFX / P12 file, in the Windows certificate store or on a hardware device (an HSM, a smart card, a USB token) that the server uses through PKCS#11 (sections 8 and 9). |
| Logs | An audit trail of the server events and, optionally, a log of every time stamp issued (section 12). |
A time stamp involves two certificates that must not be confused. The signer's certificate belongs to the person or the company that signs a document, a program or a script, and it stays with the client. The time stamping certificate belongs to the server: it signs the time stamps. This manual is about the second one. The people who verify a time stamp must trust the time stamping certificate (or the certification authority that issued it) in the same way as they trust any other certificate (section 14).
The server can create a time stamping certificate for you (section 8.2). It is a self-signed certificate meant for tests and for internal use: nobody trusts it until its certificate is installed on their computer. For a service that other people rely on, use a time stamping certificate issued by a certification authority that those people trust.
Useful links
| What | Address |
|---|---|
| Product website | The website of the product is available here: https://tsaserver.com/ |
| Test server | A fully functional version of our Time Stamp Server (RFC 3161 compatible) is available for testing here: https://ca.signfiles.com/tsa/ |
| Download | Download Time Stamp Server for IIS: https://tsaserver.com/TSAServer.zip |
| Pricing & licensing | License options and prices: https://tsaserver.com/pricing |
| Guides | Guides on deploying and operating a Time Stamping Authority: https://tsaserver.com/guides |
| Contact | Questions about licensing or a specific setup: https://tsaserver.com/contact |
2. Requirements and planning
| Item | Requirement |
|---|---|
| Operating system | Windows 10 or Windows Server 2012 or later, with Internet Information Services (IIS). |
| .NET | Microsoft .NET Framework 4.8, and the ASP.NET 4.8 feature enabled in IIS (section 3.1). |
| Application pool | .NET CLR version v4.0 with the Integrated pipeline. The application runs in a 64-bit and in a 32-bit pool; this matters when you use a PKCS#11 library, because the library must have the same bitness as the pool (section 9.5). |
| Disk | The account that runs the application pool must be able to write in the application folder: the server saves its configuration, the certificate files and the logs there (section 3.5). |
| Clock | Mandatory: the machine must be synchronized with an (S)NTP time server. The time stamps contain the UTC time of the machine, and wrong time on the machine means time stamps with the incorrect time (section 4). |
| Certificate | A time stamping certificate and its private key (section 8), or let the server create a test certificate. |
| Network | The client computers must reach the IIS site. Use HTTPS at least for the administration pages and for clients that send a user name and a password (section 3.6). |
| Browser | A current web browser, for the administration pages. |
Decide before you install
| Question | Why it matters |
|---|---|
| Where is the key of the time stamping certificate? |
PFX file: the simplest choice. The key is in a file on the server. Good for tests and for installations where a software key is accepted. Windows certificate store: the certificate is installed in Windows (also when its key is managed by the CNG or CSP provider of a device). The account that runs the application must be able to use the key. PKCS#11: the key is in an HSM, a smart card or a USB token and never leaves it. The server talks to the library of the device. The account that runs the application must be able to use the library and the device. This choice has the most things to check, so it has its own chapter (section 9). |
| Which Windows account runs the application? | The server is not run by you: it runs in the IIS application pool, under the identity of the pool. Rights, certificate stores and hardware devices are checked for that account. This is the source of most installation problems (section 9.5). |
| HTTP or HTTPS? | The login cookie of the administrator is sent only over HTTPS (section 7). |
| Must the clients log in? | You can accept only the users that you create (section 11). |
3. Installation on IIS
The time stamp server is installed as an application of an IIS web site. Use an account with Administrator rights for the steps below.
3.1 Enable ASP.NET
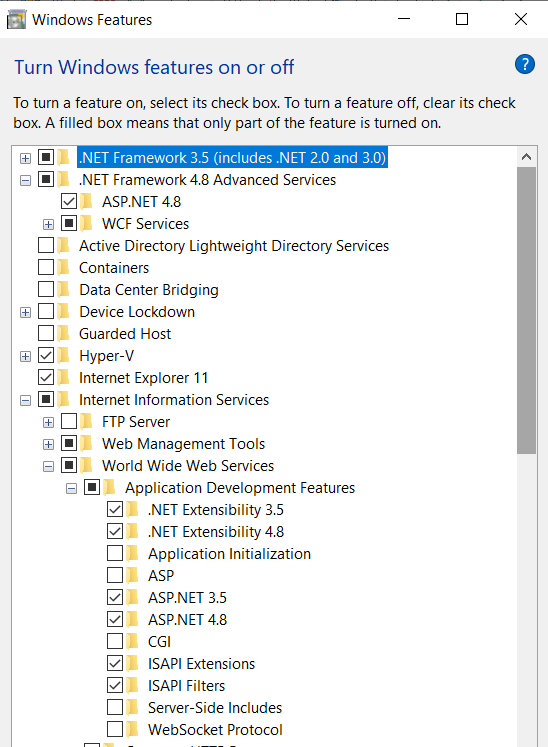
On Windows 10 and Windows 11 open Control Panel → Programs and Features → Turn Windows features on or off. On Windows Server use Server Manager → Add Roles and Features and select the Web Server (IIS) role. Under Internet Information Services → World Wide Web Services → Application Development Features select ASP.NET 4.8. Windows selects the other components that it needs, such as .NET Extensibility 4.8.
3.2 Copy the files
Download the installation package from the address in the useful links and unpack it. Copy the content of the TSAServer folder to a folder of the server, for example C:\TSAServer. The folder contains the pages (*.aspx), Web.config, the bin folder and the settings folder. Do not put it under the folder of another web application.
3.3 Create the application pool
A dedicated pool keeps the account of the time stamp server separate from the other applications of the server, and it is the place where you decide which account runs the server.
- Open Internet Information Services (IIS) Manager and select Application Pools → Add Application Pool...
- Type a name, for example
TSAPool. Select .NET CLR version v4.0 and the Integrated managed pipeline mode. - Keep the default identity, ApplicationPoolIdentity, unless you have a reason to change it. The account has the name
IIS AppPool\TSAPool(the name of the pool, with the prefixIIS AppPool\). The identity can be changed later in Advanced Settings → Process Model → Identity: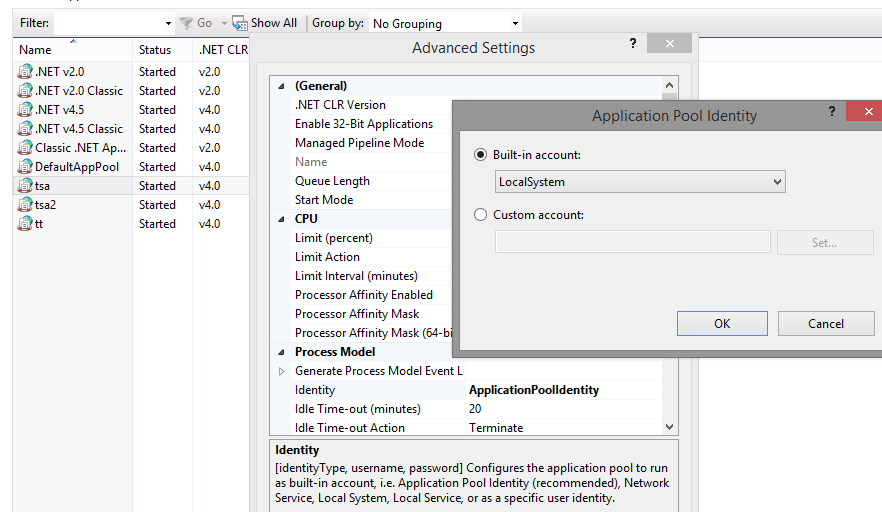
The identity of an application pool: a built-in account (ApplicationPoolIdentity, NetworkService, LocalSystem, LocalService) or a custom account.
Write down the identity of the pool. Section 9.5 explains why the certificate selection problems are almost always problems of this account: its rights, its certificate store, its access to the device.
3.4 Add the application
In IIS Manager right-click the web site (for example Default Web Site) and select Add Application.... Type the alias (for example tsa), select the application pool that you created and type the physical path of the folder (C:\TSAServer).
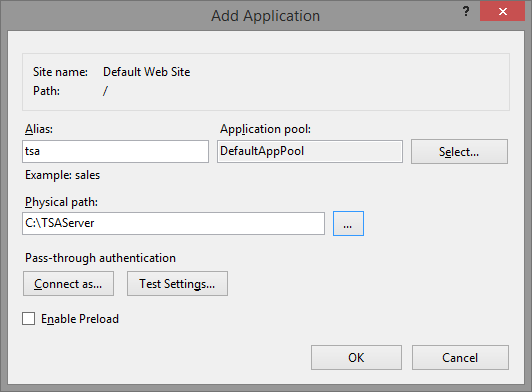
http://localhost/tsa/ on the server itself, or https://your-server/tsa/ from the network. (The pool shown here is DefaultAppPool; select your own pool with Select....)3.5 Give the application pool the rights it needs
The server saves files in its own folder: the configuration, the users, the logs, the certificate files (settings folder) and the public certificate (TSACertificate.crt). The account of the application pool therefore needs the Read, Write and Execute rights (the Modify right) on the application folder. From a Command Prompt run as Administrator:
icacls "C:\TSAServer" /grant "IIS AppPool\TSAPool:(OI)(CI)M"Use the account of your pool. For a custom identity use DOMAIN\user or COMPUTER\user. The rights are inherited by the files and folders that the server creates later.
The main page shows a red message that ends with Write access is mandatory for the Timestamp Server installation folder, followed by the path of the folder. Give the account of the pool the Modify right and reload the page.
3.6 IIS authentication and HTTPS
- Anonymous Authentication must be enabled for the application. The time stamp users (section 11) are checked by the server itself, not by IIS.
- Basic Authentication must be disabled for the application, and Windows Authentication should be disabled too. If IIS asks for a Windows account, the clients cannot send the user name and the password that the server expects.
- Use HTTPS. Add an HTTPS binding to the web site with a server certificate. The login cookie of the administrator is marked Secure, so the browser keeps it only on HTTPS connections (the browsers accept it also for
http://localhost, on the server itself). The user names and the passwords of the time stamp clients travel in clear over plain HTTP.
3.7 First start
Open the address of the application in a browser on the server, for example http://localhost/tsa/. The main page of the server appears (section 5). If you get an error page instead, check:
- that the ASP.NET 4.8 feature is installed (3.1);
- that the application pool uses .NET CLR version v4.0 and the Integrated pipeline;
- that the physical path of the application is the folder that contains
Default.aspxandWeb.config.
Make sure that the clock of the machine is synchronized with an (S)NTP time server (section 4). The server takes the time of the time stamps from the machine.
4. Synchronize the clock of the server
TSA Server has no clock of its own. It writes in every time stamp the UTC time of the machine on which it runs. If the time of the machine is not correct, the time stamps are issued with the incorrect time, and nothing in them shows it: they look valid. A time stamp that was issued with a wrong time stays wrong; it cannot be corrected afterwards.
The person who installs the server must make sure that the machine is synchronized with an (S)NTP time server, before the server is used and for as long as it runs.
The server reads the clock of Windows at the moment of each response. The synchronization of the clock is therefore not a setting of the server: it is a task of the computer, and it is a mandatory step of the installation.
How to synchronize the machine
- The server is a member of an Active Directory domain. You can use the clock of the Domain Controller: a member of the domain takes its time from the domain, through the Windows Time service. Check that the service works (below).
- The server is not in a domain. Set an (S)NTP time server for the Windows Time service. In a Command Prompt run as Administrator:
Use the time server that your organization prescribes, if there is one.w32tm /config /manualpeerlist:"time.windows.com" /syncfromflags:manual /update w32tm /resync - You can also use an application that does the synchronization for you. A time synchronization application, Time Sync Tool (timesynctool.com), is available free of charge. It keeps the clock of the computer synchronized with the (S)NTP time servers and shows the state of the synchronization:
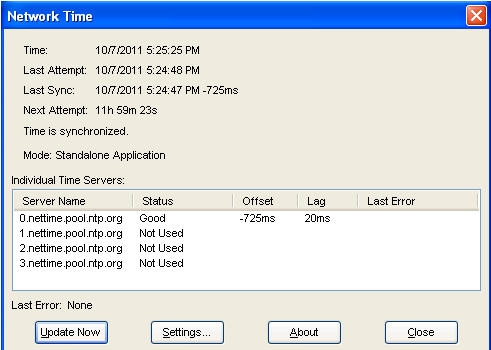
A time synchronization application: it shows the last synchronization, the next attempt and the state of the (S)NTP time servers. (The picture comes from an earlier version of the documentation.)
The synchronization needs an (S)NTP connection, so the UDP port 123 must be open between the server and the time server (check the firewall of the server and the firewall of the network).
Check the synchronization
w32tm /query /statusshows the state of the Windows Time service. Look at Source and Last Successful Sync Time. Leap Indicator: 3(not synchronized) means that the clock is not synchronized.- The service Windows Time (
w32time) must be running. In PowerShell:Get-Service w32time. - Select the correct time zone of the computer too. The time stamps use UTC, and Windows computes it from the clock and the time zone when the time is set by hand.
- A quick check with the server itself: press Test Certificate on the configuration page (section 13). The message shows the time of the time stamp in UTC (Time Stamp Generalized Time (UTC)). Compare it with the real UTC time from a source that you trust.
Check the synchronization again after every restart of the server and after every change of the network or of the firewall, and keep an eye on it while the server runs: a clock that stopped synchronizing drifts slowly, and nobody notices.
If the clock cannot be trusted
If you monitor the clock (with a script or with a tool of your own), you can tell the server to stop issuing time stamps while the clock is wrong. While the file settings\invalidtime.sys exists, the server answers every request with the status Rejected, the text TSA time is desynchronized. and the failure the TSA's time source is not available. When the clock is correct again, your tool deletes the file and the server works again. The server itself never creates or deletes this file.
The option Set Accuracy (section 10) writes in the time stamps the accuracy that you guarantee. Set only a value that the synchronization of your machine really guarantees.
5. The main page
The main page shows the state of the server and gives access to everything else.
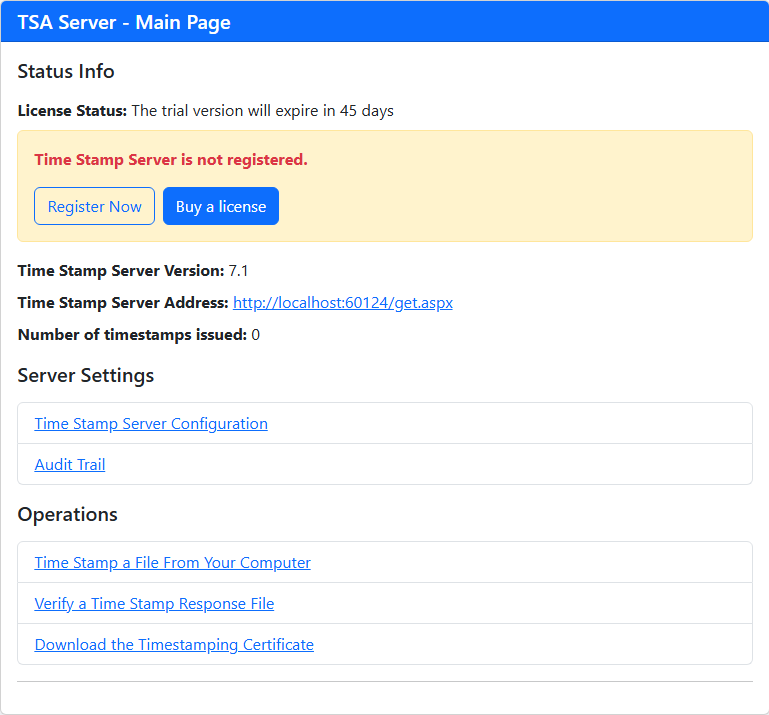
| Item | Meaning |
|---|---|
| License Status | The trial period that remains, or Registered Version (section 16). |
| Time Stamp Server Version | The version of the server. |
| Time Stamp Server Address | The address that the client programs must use, always ending with get.aspx. Click it to see that the service answers (the browser shows a short text; the service is used with POST requests by the client programs). |
| Number of timestamps issued | The number of responses that the server generated, including the responses that refused a request (for example a request with a wrong password). |
| Time Stamp Server Configuration | The settings, the time stamping certificate and the test (section 10). |
| Audit Trail | The events of the server (section 12). |
| Time Stamp a File From Your Computer | Time stamps a file that you select (section 13). |
| Verify a Time Stamp Response File | Shows the content of a time stamp file and checks its signature (section 13). |
| Download the Timestamping Certificate | Downloads the public part of the time stamping certificate (the file TSACertificate.crt). Give it to the people who must trust the server (section 14). |
| Logout | Appears when the administrator account exists (section 7). |
6. Quick start
The shortest way from a new installation to a working time stamp server:
- Synchronize the clock of the machine with an (S)NTP time server (section 4). The server writes in the time stamps the time of the machine.
- Create the administrator account. On a new installation the pages are open to everybody. Open Time Stamp Server Configuration and press Create Admin Account (section 7).
- Choose the time stamping certificate. Press Create New Certificate for a test certificate (section 8.2), or Select the Digital Certificate to use your own: a PFX file, a certificate of the Windows store or a key on a hardware device (sections 8.3 to 9).
- Test the certificate. On the configuration page press Test Certificate. The server signs a test message and a test time stamp request with the certificate. Do not go on until the test succeeds (section 13).
- Review the settings (section 10) and, if the clients must log in, create the users (section 11).
- Give the address to the clients. Copy the Time Stamp Server Address from the main page and use it in the client programs (section 14).
- Register the server before the trial period ends (section 16).
7. The administrator account
On a new installation there is no administrator account and nobody has to log in: anybody who can open the pages can change the configuration, replace the time stamping certificate and read the logs. Create the account before you open the server to the network.
- Open the configuration page and press Create Admin Account.

The buttons at the bottom of the configuration page. Create Admin Account is visible while the administrator account does not exist. - Type a user name and a password (without spaces) and press Create Account.
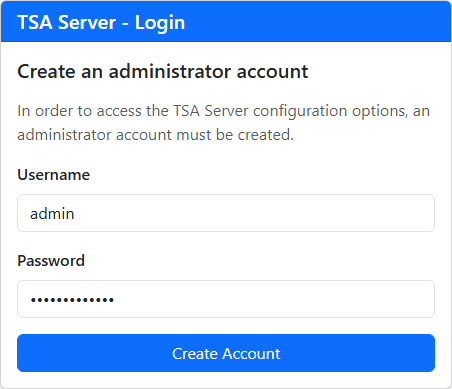
The administrator account. The server saves the user name and a hash of the password, never the password itself. - Log in with the new account.
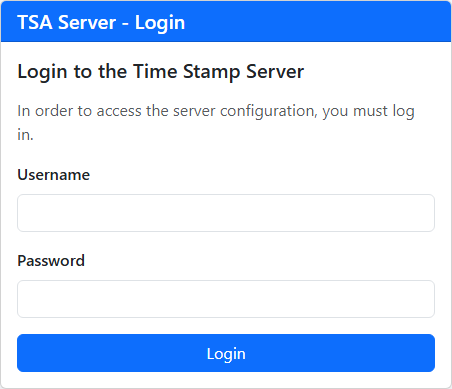
The login page. All the administration pages ask for the login. - The main page now has a Logout button.
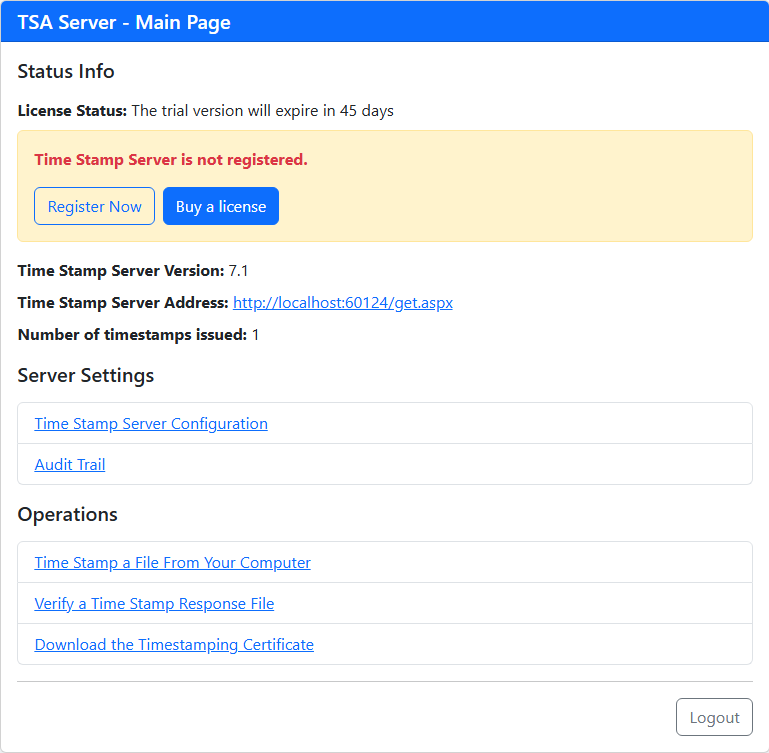
The main page after the login.
- A login is valid for at most 8 hours and ends when you close the browser or press Logout.
- The cookie of the login is sent only over HTTPS (the browsers also accept
http://localhost). If the login page appears again and again after a correct login, you are probably using plain HTTP from another computer. - The pages that ask for the login are: the main page, the configuration, the choice and the creation of the certificate, the users, the audit trail and the registration. The time stamp service (
get.aspx) and the two test pages (Apply and Verify) do not ask for the administrator login (see section 18). - If you forget the password, delete the file
settings\admpswd.sysfrom the server. The login page then offers to create a new account. Do it at once, because while the file is missing anybody who opens the login page can create the administrator account.
8. The time stamping certificate
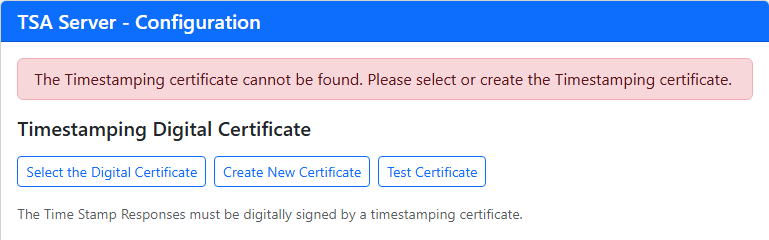
Every time stamp that the server issues is signed with the time stamping certificate. Without it the server cannot answer. On the configuration page, the area Timestamping Digital Certificate shows the certificate that is in use and the buttons Select the Digital Certificate, Create New Certificate and Test Certificate.
8.1 What a time stamping certificate must look like
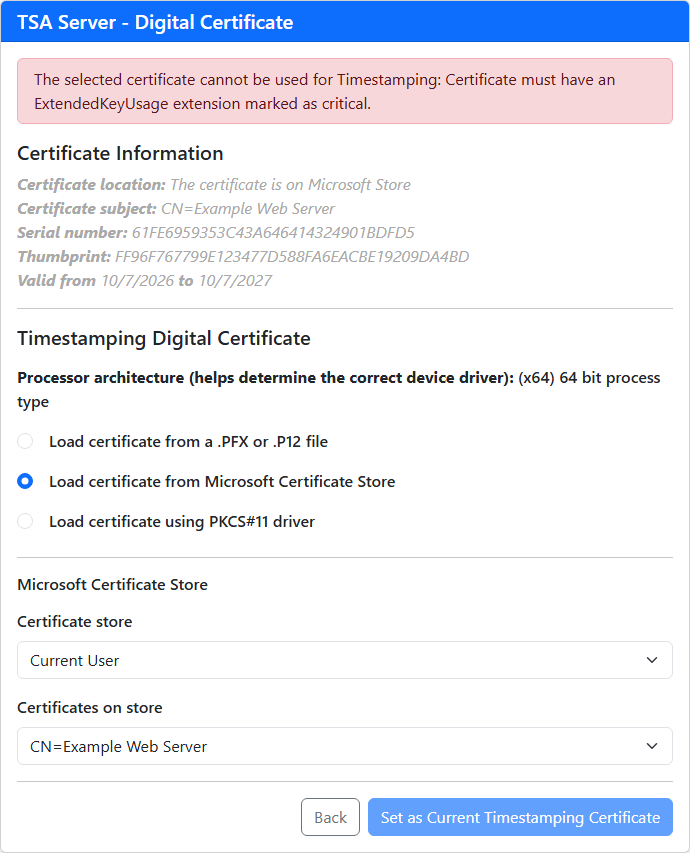
A time stamping certificate is a special certificate. An SSL certificate, a code signing certificate or a certificate for signing documents cannot be used. The server accepts a certificate only if it passes the following checks. They are made when you select the certificate, and again each time the server creates a time stamp.
| The certificate must... | Message when it does not |
|---|---|
| be an X.509 version 3 certificate with an Extended Key Usage extension | Certificate must have an ExtendedKeyUsage extension. |
| have the Extended Key Usage extension marked as critical | Certificate must have an ExtendedKeyUsage extension marked as critical. |
have only one purpose in that extension: Time Stamping (1.3.6.1.5.5.7.3.8) | ExtendedKeyUsage not solely time stamping. |
When a certificate fails, the page shows The selected certificate cannot be used for Timestamping: followed by one of the messages above, and the button Set as Current Timestamping Certificate stays disabled.
For a certificate that you order from a certification authority, ask for:
- an RSA key of 2048 bits or longer (or an ECDSA key) and a signature of the certificate with SHA-256 or stronger;
- Key Usage: Digital Signature, marked critical;
- Extended Key Usage: Time Stamping only, marked critical;
- a validity of one year or more, and a date to renew it before it expires.
The check looks only at the extensions of the certificate. It does not check the dates, and it does not check that the private key exists and that the server can use it. A certificate can be accepted on the selection page and still fail when the server tries to sign. The real test is the button Test Certificate on the configuration page (section 13).
8.2 Create a certificate with the server
For tests and for a first installation, the server can create a time stamping certificate in a PFX file. On the configuration page press Create New Certificate.
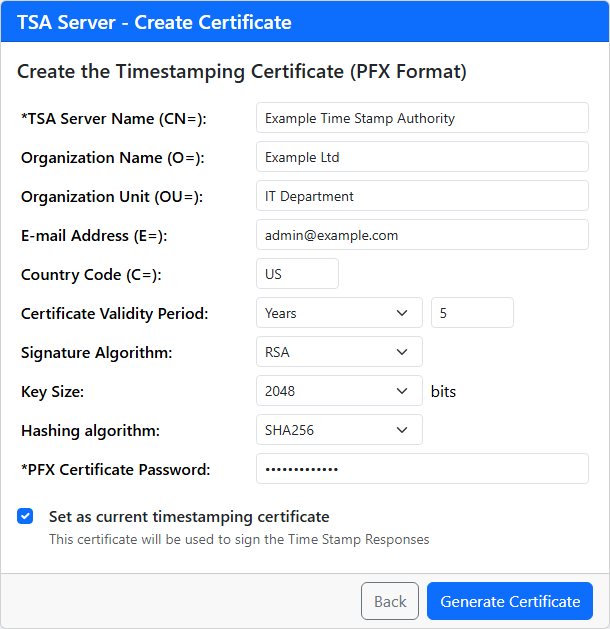
| Field | Meaning |
|---|---|
| *TSA Server Name (CN=) | The name of the certificate, for example the name of your service. Required. |
| Organization Name (O=), Organization Unit (OU=), E-mail Address (E=), Country Code (C=) | Optional. The country code has two letters. |
| Certificate Validity Period | Select Days, Months or Years and type the number. |
| Signature Algorithm | RSA or Elliptic Curves. |
| Key Size | RSA: 1024, 2048 or 4096 bits. Elliptic curves: 192, 239 or 256 bits. Use 2048 bits or more for RSA. |
| Hashing algorithm | The hash used to sign the certificate: SHA1, SHA256 (default), SHA384 or SHA512. Do not use SHA1. |
| *PFX Certificate Password | Protects the PFX file that contains the certificate and its private key. Required. Choose it carefully: you need it to use the file elsewhere. |
| Set as current timestamping certificate | When checked, the new certificate becomes the certificate of the server at once. |
Press Generate Certificate. The certificate is self-signed and has the extensions that a time stamping certificate needs: Key Usage: Digital Signature and Extended Key Usage: Time Stamping, both critical.
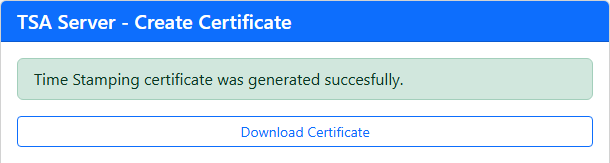
- The server keeps the PFX file in the folder
settings\certs, with a random name. Download Certificate gives you a copy (TSAServerCertificate.pfx). Keep that copy and its password in a safe place. - When the certificate is set as current, the public part is also saved as
TSACertificate.crtin the application folder. It is the file that the main page offers as Download the Timestamping Certificate. - When the certificate is set as current, the event is recorded in the audit trail (
TSA_CERTIFICATE_CREATED).
The certificate is self-signed. Programs that verify your time stamps will report that the certificate is not trusted until you install it as described in section 14. Do not use it for a service that other organizations rely on.
8.3 Select the certificate
Press Select the Digital Certificate on the configuration page to use a certificate that you already have. The page offers three sources of the certificate:
- Load certificate from a .PFX or .P12 file (section 8.4);
- Load certificate from Microsoft Certificate Store (section 8.5);
- Load certificate using PKCS#11 driver, for an HSM, a smart card or a USB token (section 9).
Under the title, the page shows Processor architecture: (x64) 64 bit process type or (x86) 32 bit process type. It tells you whether the application pool runs the server as a 64-bit or as a 32-bit process. You need it to choose the right PKCS#11 library (section 9.5).
After you select a certificate, the page shows its details and tells you whether it can be used. Press Set as Current Timestamping Certificate to save the choice. The server records TSA_CERTIFICATE_CHANGED in the audit trail. Then go back to the configuration page and press Test Certificate.
8.4 A PFX or P12 file
- Select Load certificate from a .PFX or .P12 file.
- Press Choose File and select the file. Type the Certificate password.
- Press Load Certificate. The page shows the details of the certificate and whether it can be used for time stamping.
- Press Set as Current Timestamping Certificate.
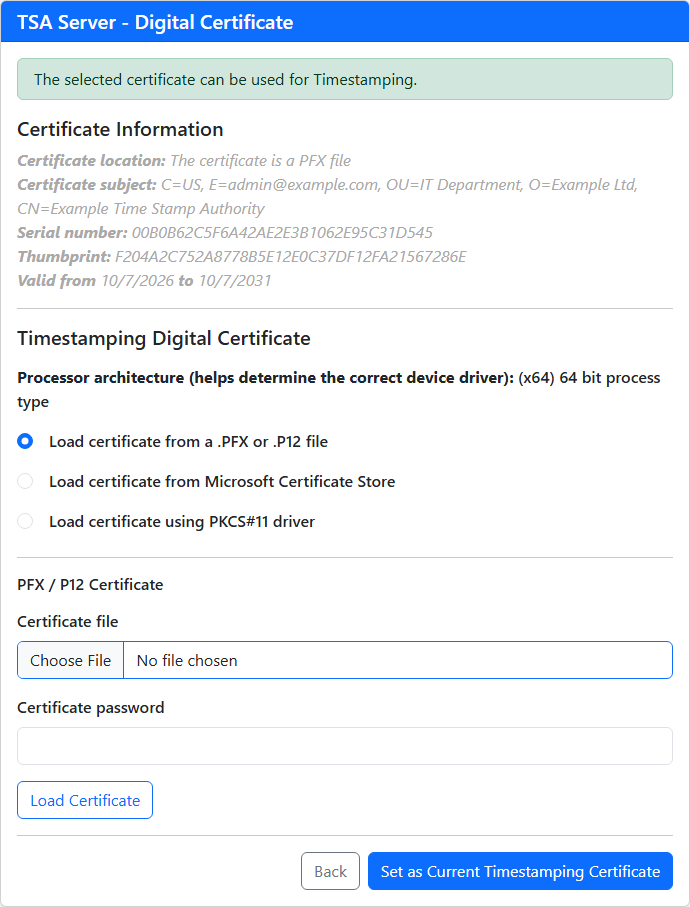
A PFX certificate that can be used for time stamping.
- The server copies the PFX file to
settings\certs(with a random name) and saves the password in the configuration file in encrypted form. Protect the folder of the server like a folder with passwords (section 18). - The server opens the PFX file with the keys in memory, so it does not need to write a key file on the disk of the server. Only if that fails does it try the machine and the user key stores of the account, which need access to the key folders of Windows.
- When the option Include whole chain on the Time Stamp Response is checked (section 10), the server uses the chain that is inside the PFX file.
- An ECDSA certificate must use a named curve (for example P-256). Windows cannot import the private key of a certificate whose curve is given with explicit parameters.
8.5 The Windows certificate store
Use this source when the certificate is installed in Windows. This includes certificates whose keys are managed by the CNG or CSP provider of a device. (For HSMs and tokens, compare it with PKCS#11 in section 9.2.)
- Select Load certificate from Microsoft Certificate Store.
- Select the Certificate store: Current User or Local Machine (explained below).
- Select the certificate in the list Certificates on store. The page shows its details and whether it can be used.
- Press Set as Current Timestamping Certificate, then press Test Certificate on the configuration page.
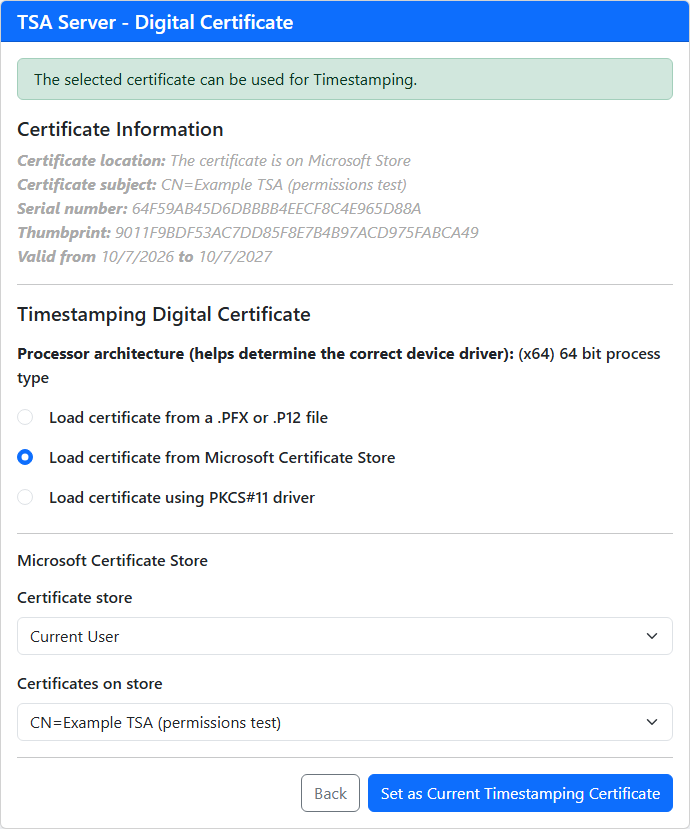
A certificate of the Current User store. The list shows all the certificates of the Personal store, also the ones that cannot be used for time stamping.
The server saves only the thumbprint of the certificate and the store, not the certificate. If the certificate is removed from the store, the page shows The Timestaping certificate cannot be found on Microsoft Certificate Store. Please select a certificate.
Current User or Local Machine?
The Current User store is the store of the account that runs the application pool. It is not your store, and it is not the store of the person who installed the certificate. The Local Machine store belongs to the computer and is the same for every account.
| The certificate was installed... | What the server sees |
|---|---|
| by you, logged on with your own account, in Current User | Nothing. The certificate is in your profile. The server sees it only if the application pool runs under your account. |
in the Personal store of Local Computer (certlm.msc, or the Certificates snap-in for the Computer account) | The certificate, in Local Machine, for any account. But the account of the application pool must also have the right to read its private key (below). |
| by the account of the application pool itself (for example a script that runs under that account) | The certificate, in Current User. |
Use Local Machine. The result does not depend on which account created the certificate or logged on to the server. Then give the account of the application pool the right to read the private key.
Give the application pool the right to use the private key
The key of a certificate in the Local Machine store is a file that has its own permissions. The account of the application pool must be allowed to read it. Use one of the methods below.
- With the Certificates snap-in. Open
certlm.msc(or mmc → File → Add/Remove Snap-in → Certificates → Computer account → Local computer). Open Personal → Certificates, right-click the certificate, select All Tasks → Manage Private Keys... and press Add.... Type the account of the pool (IIS AppPool\TSAPool; keep the location on the local computer) and allow Read. - From the command line.
certutil -store my <thumbprint>(Command Prompt as Administrator) shows the line Unique container name: the name of the key file. The key files of the computer are inC:\ProgramData\Microsoft\Crypto\Keys(CNG keys) andC:\ProgramData\Microsoft\Crypto\RSA\MachineKeys(CryptoAPI keys). Give the account the read right on that file:icacls "C:\ProgramData\Microsoft\Crypto\Keys\<unique container name>" /grant "IIS AppPool\TSAPool:R"
The user key of a certificate in the Current User store is in the profile of that user, for example C:\Users\<user>\AppData\Roaming\Microsoft\Crypto\Keys.
How to tell what is wrong
The server reports the problem when you press Test Certificate. These are the messages that we obtained in our tests, and what they mean:
| Message of the test | Meaning |
|---|---|
| Time stamping test error: The private key for this certificate was not found. | The certificate is in the store, but without a private key (only the public part was imported).
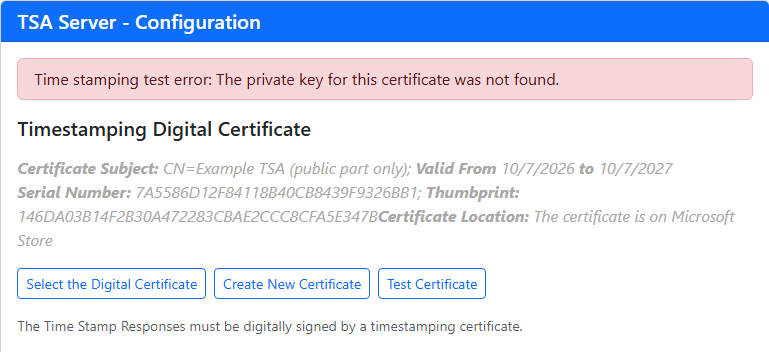 |
| Time stamping test error: The RSA signature cannot be created: Invalid provider type specified. Alternative signature: Keyset does not exist | The certificate has a key, but the account that runs the server cannot open it. We obtained this message when the account had no right to read the key file. Check the account of the application pool and the rights on the key (above).
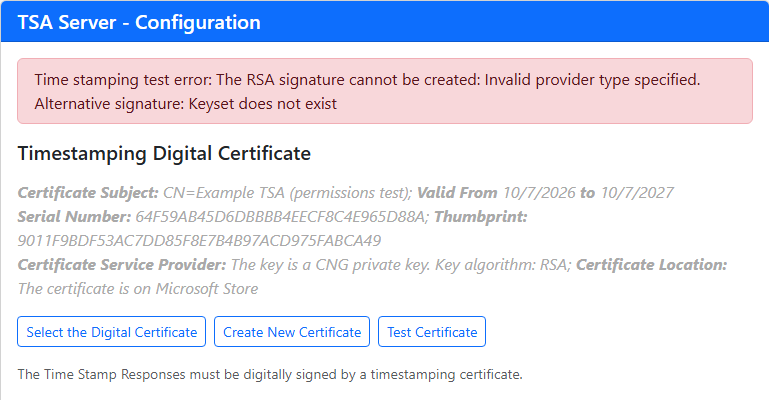 |
| ...The private key '...' (machine key of '...') cannot be opened: ... Under IIS, the application pool identity needs read access to the private key of the certificate. | The same problem for an ECDSA key: the account cannot open a machine key. The server adds the advice to the message. |
With the command certutil -user -store my <thumbprint> (certutil -store my ... for Local Machine) you can see the state of the key for the account that runs the command:
| What certutil writes | Meaning |
|---|---|
| Provider = ... / Private key is NOT exportable / Encryption test passed | The account can use the key. |
| No key provider information / Missing stored keyset | The certificate has no private key. |
| Key Container = ... / Provider = ... / Missing stored keyset | The certificate points to a key that this account cannot open (no right, or the key no longer exists). |
Remember that certutil shows the state for your account. The server runs under the account of the application pool, so a good result of certutil does not prove that the server can use the key. The proof is the Test Certificate button, which runs inside the server.
What the clients see. When the server cannot sign, the client receives the text TSA Response error. instead of a time stamp, and the audit trail records the reason (module ISSUING_TSA_RESPONSE_ERROR):
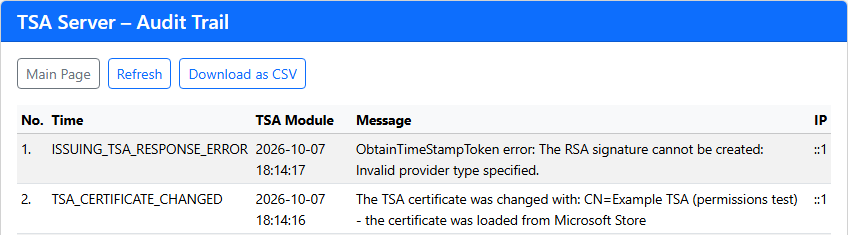
settings\log.sys to read the rest (section 12).9. HSM, smart cards and USB tokens (PKCS#11)
When the time stamping key is kept in a hardware security module (HSM), a smart card or a USB token, the private key never leaves the device and the device does the signing. Selecting such a certificate is the step where most installations get stuck, almost always because of accounts, rights and permissions and not because of the server itself. This chapter explains how the server uses the device and what to check, in the order in which the problems usually appear.
9.1 How the server uses the device
- The server uses the PKCS#11 library of the manufacturer of the device (a
.dllfile installed on the server). The library is loaded inside the IIS worker process of the application pool, under the account of the pool. - On the first request the server loads the library, opens a session with the device, logs in as the normal user with the PIN that you saved, and finds the private key of the certificate. It keeps this session open for the next requests, and it opens a new one if the device is removed or the session is lost.
- For each time stamp, the server computes the hash and sends it to the device, which returns the signature. The document of the client never reaches the device, and the private key never reaches the server.
- The server uses the mechanism CKM_RSA_PKCS for RSA keys and CKM_ECDSA for ECDSA keys. Only RSA and ECDSA keys are supported. The device must allow these mechanisms and must allow the normal user to sign without any further approval for each operation.
- The device signs one request at a time: the server serializes the use of the session. The speed of the service depends on the speed of the device.
- The certificate that goes into the time stamps comes from the public certificate (the
.cerfile) that you give to the server, not from the device. The server also uses this file to find the device that holds the certificate and the matching private key.
9.2 PKCS#11 or the Windows certificate store?
A hardware device can be used in two ways. For an HSM, choose PKCS#11.
| PKCS#11 | Windows certificate store | |
|---|---|---|
| Who talks to the device | The server, directly, through the PKCS#11 library. | Windows, through the CNG or CSP provider that the device installs. |
| The PIN | You type it once; the server saves it and logs in by itself. | The provider asks for it. A PIN window cannot be answered by a server, so the device must be set to work without it. |
| Which Windows account created or owns the certificate | Does not matter. The certificate is a .cer file. | Matters a lot (Current User store), or you must use Local Machine and give rights on the key. |
| Bitness | The PKCS#11 library must have the bitness of the application pool. | The CNG or CSP provider of the device must exist in the bitness of the application pool. |
| Use it for | HSMs and devices with a PKCS#11 library that can run in a service. | Devices that put their certificates and keys in Windows and have no PKCS#11 library. |
Smart cards and USB tokens are made for a person who types a PIN in a window. Their software (the middleware) does not always work in a service, without a screen. We cannot guarantee that every token works with the server. With a PKCS#11 library that works in a service, the server types the PIN itself and a token can be used. Test it as described below.
9.3 Before you start
- The certificate is on the device and it is a time stamping certificate (section 8.1). If the key pair is generated on the device (the request, the CSR, is created with the tools of the device), the certification authority must issue the certificate with Time Stamping as the only and critical extended key usage. The certificate that the authority returns is then installed on the device.
- The device allows signing without user intervention. For an HSM, the partition must be activated and the normal user must be able to sign with the PIN or password alone, without a PED, without an administrator PIN and without any other PIN mechanism for each operation. A network HSM must have the server registered (authorized) as a client of the partition, which the administrator of the HSM does once for each server.
- The software of the device is installed on the server (the HSM client, or the middleware of the token), in the version that the manufacturer prescribes for your Windows version. Check it with the tool of the manufacturer: the device, the partition and the certificate must be visible.
- You know the bitness of the application pool. The configuration pages show it: (x64) 64 bit process type or (x86) 32 bit process type (section 8.3). A 64-bit pool needs the 64-bit library. A 32-bit pool (Enable 32-Bit Applications set to True in the advanced settings of the pool) needs the 32-bit library.
- You have the public certificate in a
.cerfile. Export it with the tool of the manufacturer, or ask the certification authority for it, or export it from the Windows store (certmgr.msc) if the middleware copies the certificate there. Export only the public part (No, do not export the private key). - You know the account of the application pool and you have read section 9.5.
9.4 Step by step
- On the configuration page press Select the Digital Certificate and select Load certificate using PKCS#11 driver.
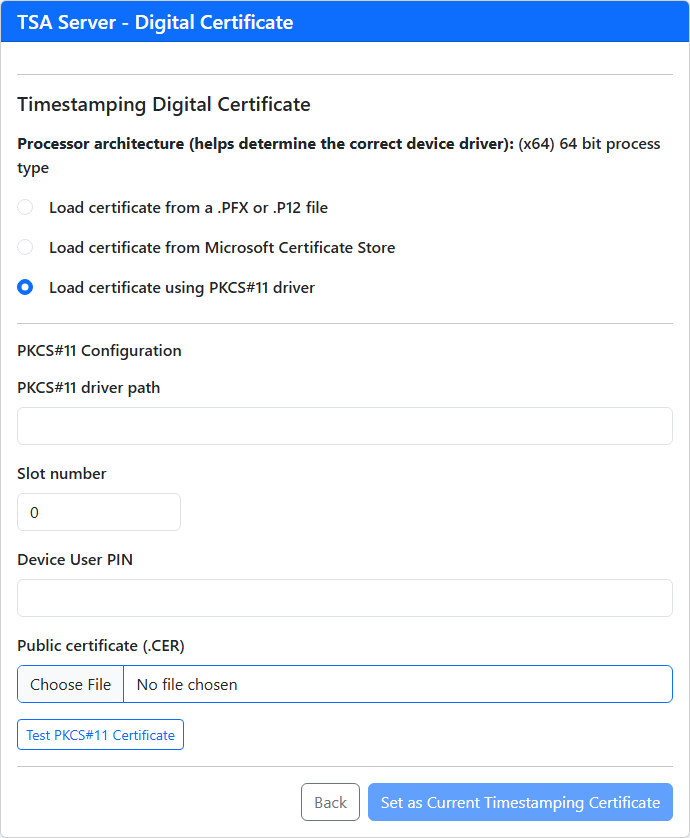
The PKCS#11 area: the library, the slot, the PIN of the device and the public certificate. - Fill in the fields:
Field What to type PKCS#11 driver path The full path of the library, on the server. For example C:\Program Files\SafeNet\LunaClient\cryptoki.dll(an HSM client) orC:\Windows\System32\eTPKCS11.dll(a token middleware). The file must exist and must be readable by the account of the pool; otherwise the page says Driver file not exists.Slot number A whole number, 0 for the first device. It is the position in the list of the slots that have a device present, starting from 0; it is not the slot ID that the tools of the manufacturer show. The server looks for the certificate in the other slots too, so a wrong number matters only when no slot shows the certificate (see section 9.6). Device User PIN The PIN or the password of the normal user of the device. The server saves it (in encrypted form) in the configuration file, and uses it to log in. The box shows the PIN in clear. Public certificate (.CER) The file with the certificate, exactly as it is on the device. After a renewal, select the new file. - Press Test PKCS#11 Certificate. The server loads the library, finds the device that holds the certificate, logs in with the PIN, finds the private key, signs a test message with SHA-256 and checks the signature with the public key of the certificate. When everything works, the page says PKCS#11 Device works as it should and contains the corresponding private key. and enables the button Set as Current Timestamping Certificate.
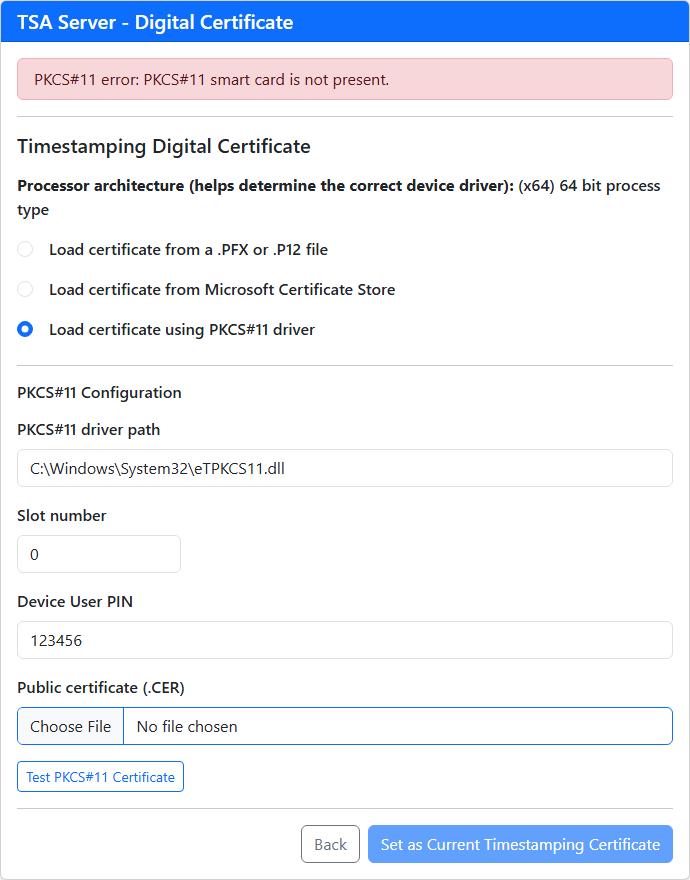
An example of a test that fails: the library was loaded, but it sees no device (here, no token was connected to the computer). The other messages are explained in section 9.7. - Press Set as Current Timestamping Certificate.
- Go to the configuration page and press Test Certificate. This test signs a test message and then asks the server itself for a complete time stamp. It must report that the time stamping response was signed correctly.
Every wrong PIN reduces the number of attempts that the device allows, and the device locks after a few. For this reason, after the device rejects the PIN, the server does not send it again. It sends the PIN again only when you change the PKCS#11 settings, when you press Test PKCS#11 Certificate or Test Certificate, or after the application restarts. If the PIN was wrong, correct it first and do the test once.
9.5 Users, rights and permissions
The most important rule
Everything that the server does with the device is done by the account of the application pool: it loads the library, reads the configuration of the device software, looks in the certificate store, opens the key file. It is not done by you, nor by the account that installed the device software, nor by the account that created the certificate. When “it works for me but not in IIS”, the cause is almost always that these two accounts are not the same.
Find the account of the application pool
In IIS Manager select Application Pools, select the pool of the server, and open Advanced Settings... → Process Model → Identity. The Task Manager (Details tab, column User name, process w3wp.exe) shows the account of the running process; for the default identity it shows the name of the pool.
| Identity of the pool | Name to use in permissions | What to know |
|---|---|---|
| ApplicationPoolIdentity (default) | IIS AppPool\<pool name> | Each pool has its own account, with only the rights that you give to it by name. It has its own, empty, Current User certificate store. |
| NetworkService | NT AUTHORITY\NETWORK SERVICE | An account of Windows shared by several services. |
| LocalSystem | NT AUTHORITY\SYSTEM | Very wide rights on the computer. It solves most rights problems at once, so it is useful to diagnose (see below). It is not a good permanent choice. |
| Custom account | DOMAIN\user or COMPUTER\user | For example the account that owns the device or generated the certificate. It is usually a member of the local group IIS_IUSRS. Load User Profile should be True in the advanced settings of the pool, so that the profile of the account (its Current User store and its registry) is loaded. |
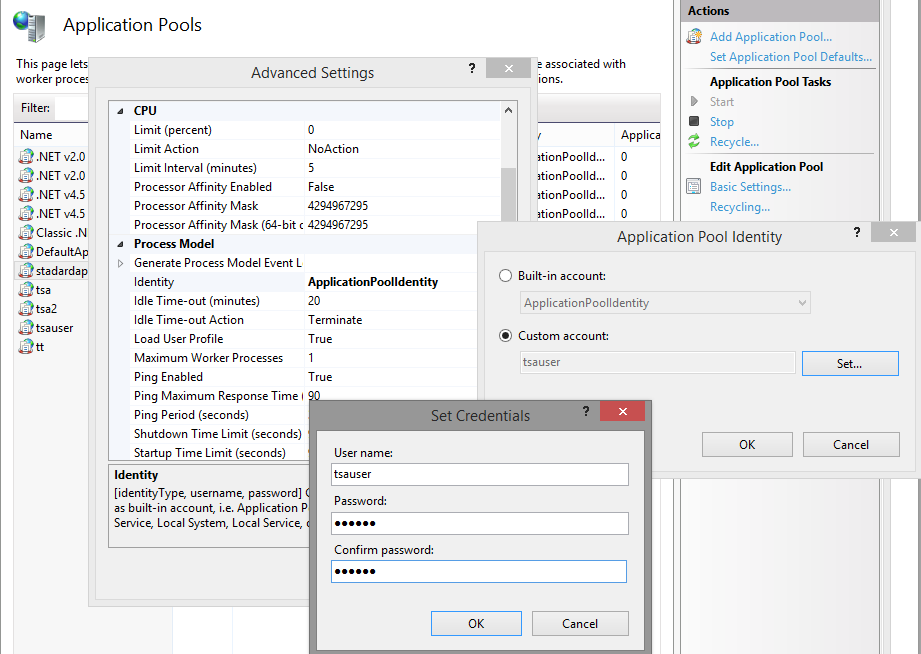
When you change the identity or a setting of the pool, IIS restarts the pool. Wait 20 to 30 seconds, then test again.
What the account needs for PKCS#11
| The account must be able to... | How to check, and what to do |
|---|---|
| read and run the library and the files that it needs | Give Read & Execute on the folder of the manufacturer (for example C:\Program Files\SafeNet\...) to the account. If the account cannot see the file, the server cannot tell the difference between “missing” and “not allowed” and shows Driver file not exists. |
| read the configuration of the device software | The libraries of the HSM clients read a configuration file or the registry, and sometimes an environment variable that points to the file. Check in the documentation of the manufacturer which files, registry keys and variables the library uses, and give the account read access to them. A change of a system environment variable is seen by the application pool only after IIS is restarted (iisreset from a Command Prompt run as Administrator). |
| read the files of the client of a network HSM | A network HSM client has its own certificate and key files, in the installation folder of the client. The account must be able to read them. |
| reach the device | A USB token or a smart card must be connected to the server, and the services that its software needs (for example the Smart Card service of Windows) must be running. A token that you see only in your remote desktop session is usually not visible to a service. |
| run in the right bitness | Compare the line Processor architecture of the selection page with the bitness of the library (section 9.3). |
| write in the folder of the application | The server saves the PIN, the .cer file and the logs there (section 3.5). |
Find which side is wrong
- Test inside the server. The button Test PKCS#11 Certificate runs inside the worker process, with the account of the pool. If it works, the service will work too. If the tool of the manufacturer works on your desktop but this test fails, the problem is the account, the rights or the bitness, not the device.
- Try a known account. Set the identity of the pool to the account with which the tool of the manufacturer works (or, for a quick diagnosis, to LocalSystem), wait 20 to 30 seconds and press the test again. If it works now, the problem is the rights of the account you used before. Then give those rights to the account that you want to keep, and set it back.
- Find the exact file or key that is refused. Run the Process Monitor tool of Windows Sysinternals on the server, filter on the process
w3wp.exeand on the result ACCESS DENIED, and press the test button. The tool lists the file or the registry key that the account could not open. - Read the audit trail (section 12). The reason of a failure of the service is recorded there, and in
settings\log.sys.
Devices used through the Windows store
If you use the device through the Windows certificate store (the CNG or CSP provider of the device), these points, which come from our earlier manuals and from experience with HSMs, are in addition to the previous ones:
- It is very important which Windows account is used when the certificate is generated or installed: the certificate and the link to its key belong to that account's store. Use the account of the application pool, or use the Local Machine store.
- The device must be set to not ask for the PIN for this key, so the server can sign without user intervention (disable the PED PIN, the administrator PIN and any other PIN mechanism that asks for an answer). A PIN window that nobody can see blocks the server.
- Create the application pool with the account in which the certificate was generated, apply the pool to the application, restart IIS, wait 20 to 30 seconds and open the selection page again. If the certificate is not in the list, do not go on: the server cannot use a certificate that it does not see, and nothing in the server can fix that.
- A key that the account cannot open can appear as Keyset does not exist (section 8.5) or, in earlier versions of the server, as The system cannot find the file specified. This is usually a rights problem: when a PFX file is imported into a store, its private key becomes a file in a key folder of Windows, and the account of the pool may not be allowed to read it.
Copy a certificate from Current User to Local Computer
IIS cannot use the Current User store of another account. You can make the same certificate available in Local Computer without copying the key. This works for keys that stay on a smart card or on an HSM:
- Open
certmgr.mscand export the public part of the certificate to a file, for exampled:\certificate.cer. - Open the file and note the serial number of the certificate (for example
4e54c00056bbbff410). - Open a Command Prompt as Administrator and import the certificate into the Personal store of the computer. The certificate is imported without the link to the private key:
certutil -addstore -f "My" "d:\certificate.cer" - Create the link to the private key. Type the PIN of the device if it is asked:
certutil -repairstore my "4e54c00056bbbff410" - The certificate is now in Local Machine, with the link to its key, ready to be selected (section 8.5).
9.6 Useful tricks
- The slot number is only a hint. The server opens the slots and compares the certificates that it can read without a login with your
.cerfile, and uses the slot that holds it (the configured slot is checked first). The PIN is sent only to that slot, never to another device. If no slot shows the certificate without a login (some HSMs show it only after the login), the configured slot is used. An invalid slot number then gives the message ...the slot N does not exist. Total number of slots on the device are: X. The first slot is: 0. - RSA and ECDSA are not equal. For an RSA key, the server finds the private key by its public key, so the device does not need to hold the certificate. For an ECDSA key, the certificate must be on the device and its CKA_ID must be the same as the CKA_ID of the private key.
- After a renewal of the certificate, select the new
.cerfile, press the test and set it as current again. If the new certificate has a new key, it must be in the device and the PIN must see it. - The first request after a pause can be slower. IIS stops an idle worker process (20 minutes by default). The next request starts it, loads the library and logs in again.
- The PIN box shows the PIN in clear. Do not leave the page open, and do not show the screen while you type it.
- A failure of the device does not need a restart. If the token is removed and connected again, or the session is lost, the server rebuilds the session by itself on the next request.
- A rejected PIN stays rejected until you press a test button, change the settings or restart the application (section 9.4). After you fix the PIN or unlock the device, press Test Certificate.
9.7 Messages and solutions
The messages below are shown by the test of the selection page (with the prefix PKCS#11 error:), by the test of the configuration page, or are recorded in the audit trail when a request fails. The first seven were obtained in tests.
| Message | Cause and solution |
|---|---|
| Please select the PKCS#11 device driver file (e.g. C:\Program Files\SafeNet\LunaClient\cryptoki.dll). | The path of the library is empty. |
| Driver file not exists. | The path is wrong, or the account of the pool cannot read the folder of the library. Check the path on the server and the rights. |
| Slot mumber must be numeric (e.g. 0): ... | Type a whole number in Slot number. |
| Please select the .CER certificate file (public part). | Select the file of the certificate. The file is not kept by the browser after each action: select it again before you press the test. |
| PKCS#11 smart card is not present. | The library was loaded, but it reports no device to the account of the pool. Check that the device is connected to the server, that its software is installed and configured for this account, the rights of section 9.5 and, for a network HSM, that the partition is activated and the server is registered as a client. |
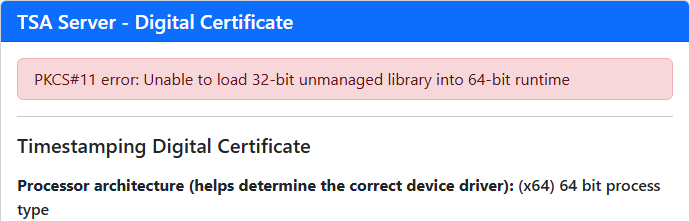
| Unable to load 32-bit unmanaged library into 64-bit runtime | The library has another bitness than the application pool (or the reverse). Select the library with the same bitness as the pool; the selection page shows the bitness of the process.
 |
| Unable to get pointer for C_GetFunctionList function. Error code: ... Error detail: The specified procedure could not be found | The file is not a PKCS#11 library. Select the library of the manufacturer (the file usually has a name like cryptoki.dll, or a name of the product). |
| The signing certificate was not found on the PKCS#11 devices and the slot N does not exist. Total number of slots on the device are: X. The first slot is: 0 | No device shows the certificate and the slot number is out of range. Use a slot between 0 and X-1, and check that the certificate is on the device. |
| The PKCS#11 device rejected the PIN (CKR_PIN_INCORRECT). To avoid locking the device, the PIN is not sent again until ... | The PIN is wrong (CKR_PIN_LOCKED: the device is locked, CKR_PIN_EXPIRED: the PIN must be changed, CKR_PIN_LEN_RANGE and CKR_PIN_INVALID: the PIN has a wrong format). Correct the cause, then press a test button once (section 9.4). |
| Private key of the selected certificate was not found on the device. | The device holds no private key that matches the public key of the .cer file. Wrong file, a renewed certificate with a new key, another partition, or a key that the normal user cannot see. |
| Signing certificate was not found on the PKCS#11 device. The signing certificate on the PKCS#11 device has no CKA_ID: its EC private key cannot be identified. EC private key of the selected certificate was not found on the device. | For an ECDSA key the certificate must be on the device, and its CKA_ID must be the same as the CKA_ID of the private key. |
| The test signature of the PKCS#11 device does not match the public key of the selected certificate. | The device signed, but the signature does not verify with the certificate that you selected. The .cer file and the key that the server found do not belong together. |
| Only RSA and ECDSA (EC) keys are supported. | The certificate has another type of key. |
| PKCS#11 signature cannot be performed: ... | The failure occurred while the server was signing a time stamp. The text after the colon is the cause (for example, one of the messages above). |
10. Server settings
The settings are on the configuration page (Time Stamp Server Configuration on the main page). The server reads them again when they change, so you do not have to restart anything.
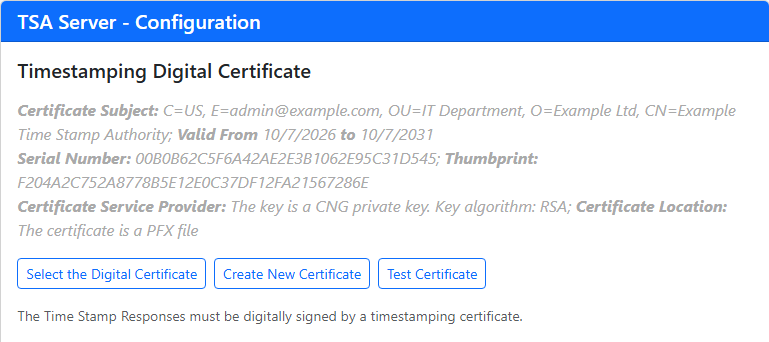
| Button | What it does |
|---|---|
| Select the Digital Certificate | Opens the page that selects the certificate: a PFX file, the Windows store or a PKCS#11 device (sections 8.3 to 9). |
| Create New Certificate | Creates a test certificate (section 8.2). |
| Test Certificate | Saves the current settings and tests the certificate (section 13). |
The lines under Certificate Service Provider tell you where the key is. For a key that is managed by a CryptoAPI provider, the page shows the name of the provider, whether the key is on a hardware device and whether it can be exported. For a CNG key (the usual case today, also for the PFX files that the server creates) it shows The key is a CNG private key and the key algorithm.
The settings
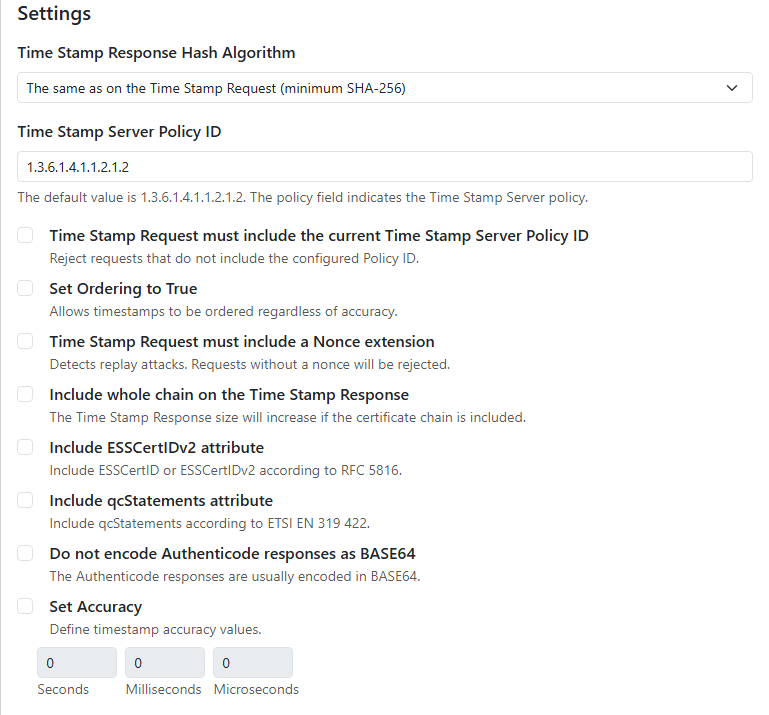
| Setting | What it does |
|---|---|
| Time Stamp Response Hash Algorithm | The hash algorithm with which the server signs the time stamp. With the first option (default), the server uses the algorithm of the request: for a request made with SHA-256, SHA-384 or SHA-512 the response is signed with the same algorithm; for a request made with SHA-1, MD5, SHA-224 or another algorithm the response is signed with SHA-256 (the hash of the client's data inside the time stamp is never changed). The options SHA-1, SHA-256 and SHA-512 force that algorithm for all the responses. The older Authenticode requests do not state an algorithm. With the first option the server signs them with SHA-1; select SHA-256 if they must be signed with SHA-256. |
| Time Stamp Server Policy ID | The policy identifier (an OID, default 1.3.6.1.4.1.1.2.1.2) that the server writes in the time stamps. It must be a valid OID: the server refuses to save the configuration otherwise (Time Stamp Server Policy ID is not valid). When a request carries its own policy OID and the next option is not checked, the server copies the OID of the request into the response. |
| Time Stamp Request must include the current Time Stamp Server Policy ID | Refuses the requests that have no policy, or another policy, than the one above. The response then says Invalid TSA Request. TSA Policy ID field must be set. or Invalid TSA Request. The TSA Policy ID is not accepted by the TSA Server. |
| Set Ordering to True | Sets the ordering field of the time stamps to true: the time stamps issued by the server can always be ordered by their time, whatever the accuracy. |
| Time Stamp Request must include a Nonce extension | A nonce is a random number that the client puts in the request and that the server returns, so that the client can detect a replayed response. With this option, requests without a nonce are refused with Invalid TSA Request. NONCE field must be set. This check is made before the check of the policy. |
| Include whole chain on the Time Stamp Response | Puts the certificate chain of the time stamping certificate in the time stamp, not only the certificate. For a PFX file the server uses the chain that is in the file. For a certificate of the Windows store or of a PKCS#11 device, Windows builds the chain from the certification authority certificates installed on the server; the chain contains only what Windows finds (at least the certificate itself). The chain makes each time stamp larger: do not select it if you issue many time stamps and each must be small. |
| Include ESSCertIDv2 attribute | Unchecked: the time stamp identifies the signing certificate with the older ESSCertID attribute (it uses a SHA-1 hash). Checked: with ESSCertIDv2 (RFC 5816), which allows other hash algorithms. Check it when a client or a policy requires that SHA-1 is not used anywhere. |
| Include qcStatements attribute | Adds the qcStatements extension described in ETSI EN 319 422 to the time stamps. Leave it unchecked unless a client asks for it. |
| Do not encode Authenticode responses as BASE64 | The answers to Authenticode requests are sent Base64-encoded, which is what the Windows tools expect. Check this option only for a client that needs the binary answer. |
| Set Accuracy | Puts the accuracy (seconds, milliseconds, microseconds) in the time stamps: the maximum difference that you guarantee between the time of the time stamp and the real time. The three boxes are enabled when the option is checked. Set only a value that your time source (section 4) really guarantees. Values that are zero are not written. |
Authentication and log
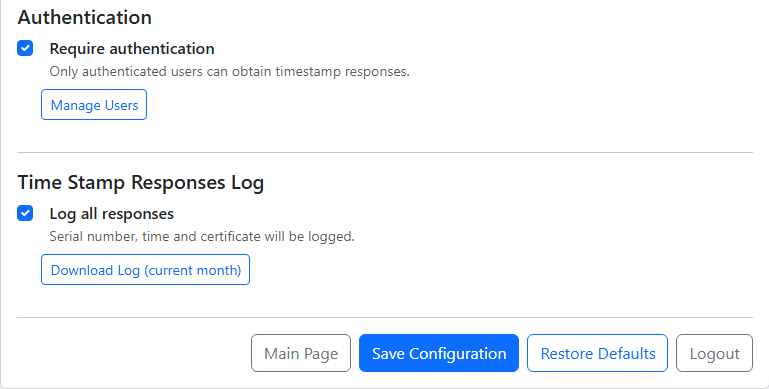
| Item | What it does |
|---|---|
| Require authentication | Only the users that you created can obtain time stamps (section 11). The button Manage Users opens the list of users. |
| Log all responses | Saves a line in a log file for every response of the server (section 12). The button Download Log (current month) downloads the log of the current month as a CSV file. Use this option with care if you issue more than 100,000 time stamps or if the speed of the server is important. |
| Main Page | Goes back to the main page. |
| Create Admin Account | Creates the administrator account (section 7). It is visible only until the account exists. |
| Save Configuration | Saves the settings of the page. |
| Restore Defaults | After you confirm, puts the default values in the form of the page. Nothing is changed on the server until the settings are saved. |
| Logout | Ends the login of the administrator. |
- The two options Require authentication and Log all responses act at once: when you click one of them, the page is sent to the server and the whole configuration of the page is saved.
- The button Test Certificate also saves the settings of the page before it tests.
- For everything else, press Save Configuration. The page shows Configuration saved successfully.
11. Users and authentication
By default anybody who can reach the server can get a time stamp. When you check Require authentication, the server accepts only the users that you create, and it can limit the number of time stamps of each one. Press Manage Users on the configuration page to open the list.
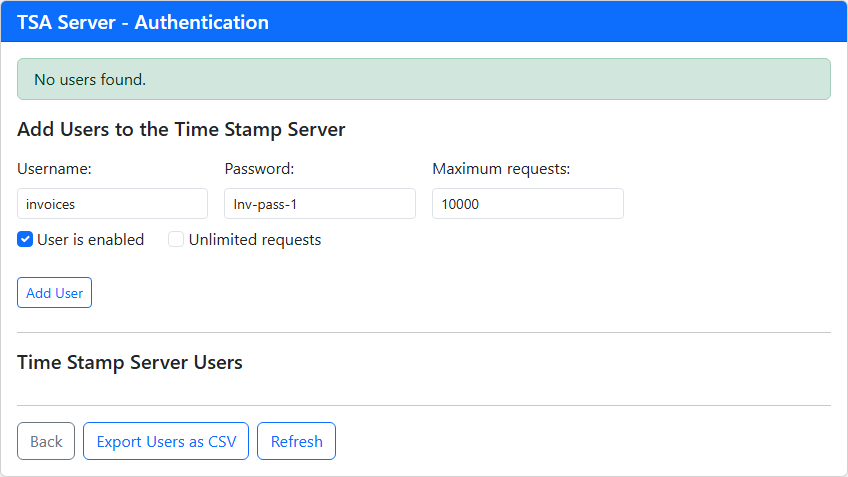
| Field | Meaning |
|---|---|
| Username, Password | The credentials that the client programs use. Neither can be empty and the user name cannot contain spaces. |
| Maximum requests | The number of time stamps that the user can obtain (default 10000). When it is reached, the requests of the user are refused. |
| Unlimited requests | No limit for this user. |
| User is enabled | A user that is not enabled cannot obtain time stamps. Use it to suspend an account without deleting it. |
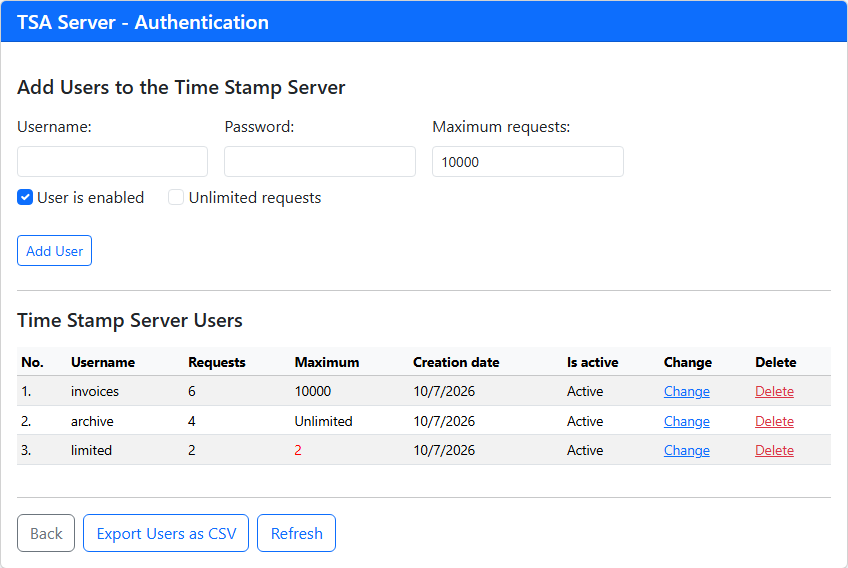
- Change edits a user (enabled, maximum number of requests, and the password: leave the box with the asterisks to keep the old password). Delete removes the user. Export Users as CSV saves the list; Refresh reloads it.
- The server saves the hash of the password, not the password.
- The number of requests of each user is counted in memory and written to the file after every 100 requests, or after 30 seconds (when the next request arrives). The list can therefore be a few requests behind.
- The test of the configuration page and the page Time Stamp a File From Your Computer do not need a user.
How the client sends the credentials
- HTTP Basic authentication (the user name and the password in the
Authorizationheader). Most programs that have the boxes user name and password for the time stamp server use it. IIS must not ask for its own authentication (section 3.6). - In the address, for programs that cannot send credentials (for example Adobe Reader and PowerShell):
Use this form only over HTTPS. The password is part of the address, and IIS writes the addresses of the requests in its log files.https://tsa.example.com/tsa/get.aspx?u=username&p=password
What the client receives when it is refused
A request that is refused does not produce an HTTP error. The server returns a time stamp response with the status Rejected and a text. This is what the programs show:
| Text in the response | Cause (the audit trail records the detail) |
|---|---|
| Invalid credentials to login to the TSA server. | No user name, an unknown user, or a wrong password. |
| User is not active. | The user is not enabled. |
| Not enough time stamp requests. | The user reached the maximum number of requests. |
| Invalid TSA Request. NONCE field must be set. | The request has no nonce, and the server requires it (section 10). |
| Invalid TSA Request. TSA Policy ID field must be set. Invalid TSA Request. The TSA Policy ID is not accepted by the TSA Server. | The server requires the policy of the server, and the request has none or another. |
| TSA time is desynchronized. | The clock of the server is declared not valid (section 4). |
| The trial version is expired. | The trial period ended and the server is not registered (section 16). |
12. Audit trail and logs
The audit trail
The server records its events in a log. Open Audit Trail on the main page to see the 200 newest entries, the newest first. The buttons are Main Page, Refresh and Download as CSV (the whole log).
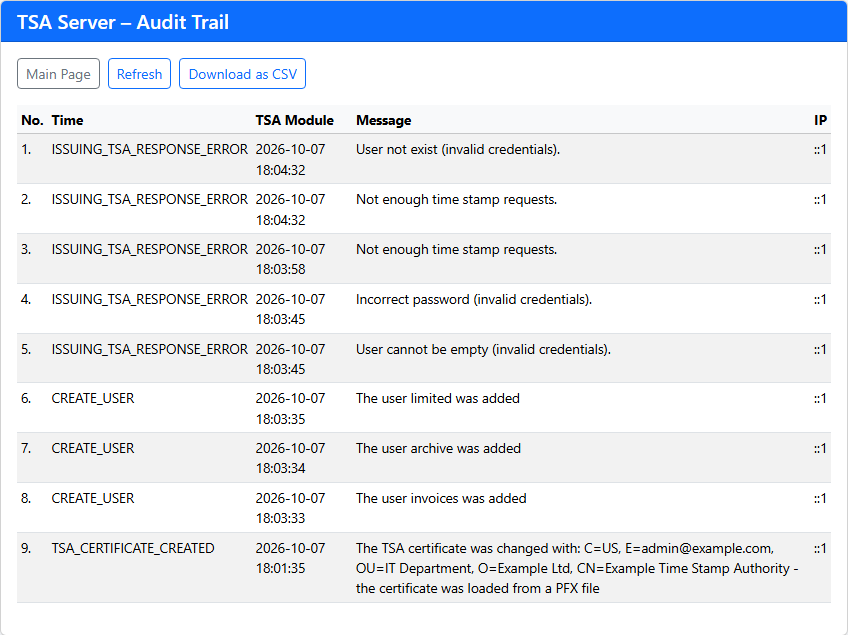
| Module | Event |
|---|---|
TSA_CERTIFICATE_CREATED | A certificate was created by the server and set as current. |
TSA_CERTIFICATE_CHANGED | The time stamping certificate was changed (the message names the certificate and where it was loaded from). |
CREATE_USER, CHANGE_USER, DELETE_USER | A user was added, changed or deleted. |
ISSUING_TSA_RESPONSE_ERROR | A request was refused (wrong password, no more requests...) or the server could not sign. The message gives the reason. |
ISSUING_TSA_AUTHENTICODE_RESPONSE_ERROR | The same, for an Authenticode request. |
TSA_CONFIGURATION_ERROR | The configuration is not valid, or the time stamping certificate cannot be found or loaded. |
INVALID_TSA_TIME_ERROR | A request arrived while the clock was declared not valid (section 4). |
VERIFY_RESPONSE_ERROR | A file that was sent to the pages Verify or Apply could not be processed. |
IO_OPERATION | The server could not read or write one of its files (for example the users or the log of the responses). |
- The log is the file
settings\log.sys. It is a text file with four values on each line: date and time, module, IP address, message. It is never rotated: it grows until you archive it. - Some messages, for example the messages of the key that cannot be used (section 8.5), continue on a second line. The page shows only the first line. Open the file or download the CSV to read the whole message.
The log of the responses
When Log all responses is checked (section 10), the server records every response, those that were granted and those that were refused. There is one file for each month, settings\responses_YYYY_M.sys (for example responses_2026_10.sys), and the button Download Log (current month) gives you the current one as a CSV file with a header line:
| Column | Meaning |
|---|---|
| Server Time | The local time of the server when the response was generated. |
| UTC Time | The time written in the time stamp (UTC). |
| Response Code | Granted or Rejection. |
| Response Message | OK, or the reason of the refusal. |
| Hash Algorithm | The hash with which the response was signed. |
| TSA Response Serial Number | The serial number of the time stamp (- for a refused request). |
| TSA Certificate, TSA Certificate Serial Number | The certificate that signed. |
| Username, IP | The user (or the internal test) and the address of the client. |
A line looks like this:
"10/7/2026 6:04:32 PM","10/7/2026 15:4:32.312ms","Granted","OK","sha256","639269821267429678","C=US, E=admin@example.com, OU=IT Department, O=Example Ltd, CN=Example Time Stamp Authority","00B0B62C5F6A42AE2E3B1062E95C31D545","archive","::1"To keep the server fast, the lines are collected in memory and written to the file after every 100 responses or after 30 seconds (when the next response is made). The button that downloads the log writes the pending lines first. If the application pool is recycled or stopped, up to 100 lines that were not written yet can be lost.
13. Testing the server
13.1 Test Certificate
Press Test Certificate on the configuration page, every time you select or change the certificate and after every change of the account, the rights or the device. The test makes two checks:
- The server signs a test message with the certificate. This is where a key that cannot be used is detected. The message is Digital signature was performed correctly with the current Timestamping certificate. For a PKCS#11 device the server finds the device, logs in, signs and verifies the signature.
- The server sends a complete time stamp request to itself and checks the response. The message is Time stamping response was signed correctly with the current Timestamping certificate., followed by the time of the time stamp.
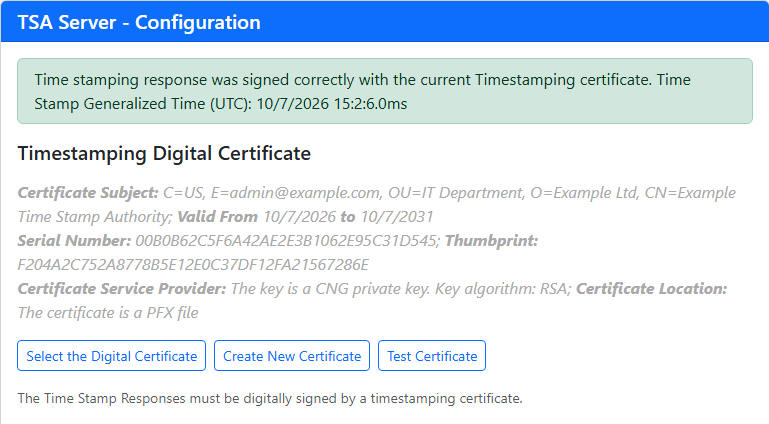
The request of the test is marked as internal, so it works also when Require authentication is checked, and it does not count for any user.
13.2 Time stamp a file
The page Time Stamp a File From Your Computer (main page) time stamps a file that you select, up to 4 MB. The server computes the SHA-256 hash of the file in memory, asks itself for a time stamp for that hash and shows the result. The file is not saved.
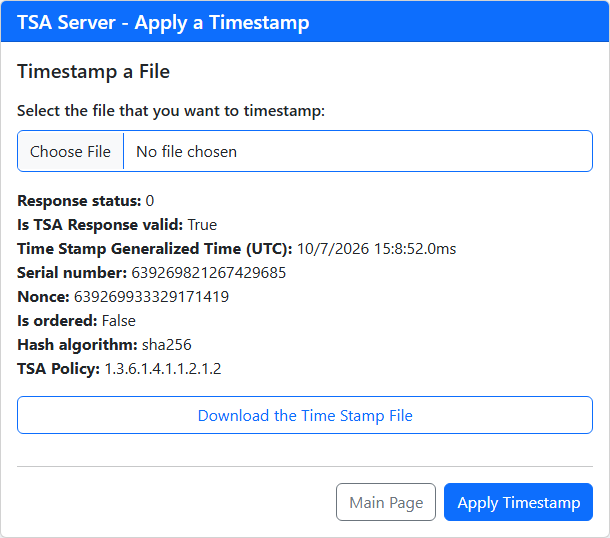
Response.tsr.13.3 Verify a time stamp
The page Verify a Time Stamp Response File reads a time stamp file (.tsr, up to 2 MB) and shows what is in it.
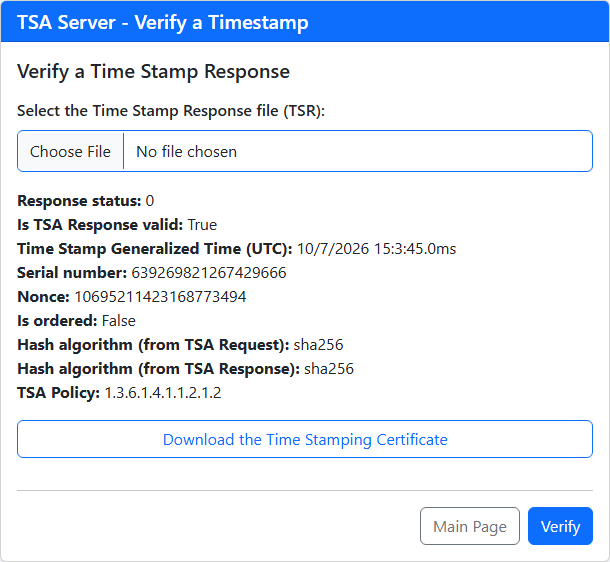
Is TSA Response valid: True means that the signature of the time stamp is correct, that is, the time stamp was not changed. The page does not compare the time stamp with an original file and does not check whether the time stamping certificate is trusted.
13.4 Test from the command line
With OpenSSL and curl you test the server as any other client would. The commands below were run against a server of this version.
- Create a time stamp request for a file (the hash of the file, with a nonce, asking for the certificate in the response):
openssl ts -query -data invoice-0001.txt -sha256 -cert -out request.tsq - Send it to the server. The content type is
application/timestamp-query. For a server that requires authentication add-u user:password:curl -s -H "Content-Type: application/timestamp-query" --data-binary @request.tsq -o response.tsr https://tsa.example.com/tsa/get.aspx - Read the response:
openssl ts -reply -in response.tsr -text Status info: Status: Granted. Status description: unspecified Failure info: unspecified TST info: Version: 1 Policy OID: 1.3.6.1.4.1.1.2.1.2 Hash Algorithm: sha256 Serial number: 0x08DF2483F445C922 Time stamp: Oct 7 15:03:45 2026 GMT Accuracy: unspecified Ordering: no Nonce: 0x946D061FABACBD76 TSA: DirName:/CN=Example Time Stamp Authority/O=Example Ltd/OU=IT Department/emailAddress=admin@example.com/C=US - Verify the response against the request and the time stamping certificate. Download the certificate from the main page (
TSACertificate.crt, in DER format), convert it, and check:
For a time stamping certificate issued by a certification authority, the file given toopenssl x509 -inform der -in TSACertificate.crt -out tsa.pem openssl ts -verify -in response.tsr -queryfile request.tsq -CAfile tsa.pem Verification: OK-CAfilemust also contain the certificates of the authority.
A request that the server refuses gives a response with a status text instead of a time stamp:
Status info:
Status: Rejected.
Status description: Invalid credentials to login to the TSA server.
If you open the address of the service in a browser (a GET request without data), the server answers with a short text, RFC 3161 and Authenticode TSA Server. It is a quick way to check that the application is running.
14. Using the server with applications
To check how a client program (Adobe Acrobat, signtool, jarsigner...) asks for a time stamp, you can try it first with the test server from the useful links, and then change only the address to your own server.
All the programs use the Time Stamp Server Address that the main page shows, for example https://tsa.example.com/tsa/get.aspx. The same address serves RFC 3161 requests and Authenticode requests. If the server requires authentication, enter a user name and a password where the program has the boxes for them, or use the form with ?u=...&p=... (section 11).
14.1 Make the time stamping certificate trusted
A program that verifies a time stamp checks the certificate that signed it. If the certificate is not trusted on the computer of the verifier, the program reports that the time stamp is unverified or not trusted (it is not invalid). The time stamping certificate that the server creates is self-signed, so it is itself the root and must be installed as a trusted root on the computers of the verifiers. If the certificate was issued by a certification authority, install the certificate of the authority instead.
- On the main page of the server press Download the Timestamping Certificate, or send the file
TSACertificate.crtto the verifier. - Right-click the file and select Install Certificate.
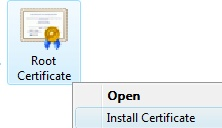
The menu of the certificate file. - Select Place all certificates in the following store, press Browse and select Trusted Root Certification Authorities. Select Current User for one user, or Local Machine for all the users of the computer.
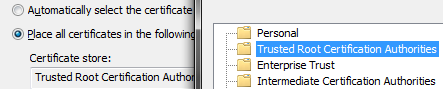
The store of the trusted root certificates. - Windows asks you to confirm. Press Yes only if you know the certificate: Windows will trust every certificate that it issues.
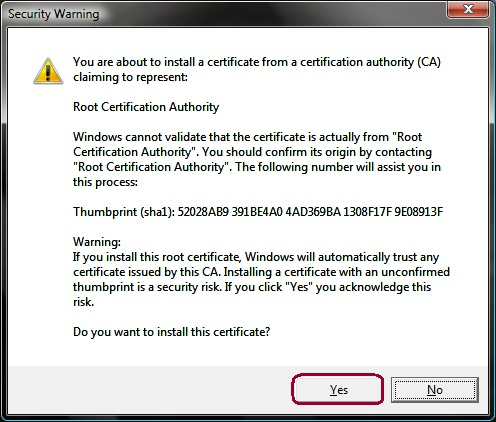
The confirmation of Windows.
14.2 Adobe Acrobat and Adobe Reader
- Open the Security Settings of Adobe (Edit → Preferences → Signatures → Document Timestamping → More; in older versions Edit → Protection → Security Settings) and select Time Stamp Servers.
- Press New, type a name and the address of the server.
- Leave This server requires me to log on unchecked if the server does not require authentication. If it does and Adobe cannot send the credentials, use the address with
?u=...&p=....
If the time stamping certificate (or its root) is not in the trusted identities of Adobe or in the Windows store, Adobe shows the time stamp as unverified, not as invalid. Install the certificate as in section 14.1, or add it to the trusted identities of Adobe.
14.3 Windows code signing (Authenticode)
With signtool, use /tr for an RFC 3161 time stamp and /td for its hash algorithm. The option /t asks for the older Authenticode time stamp; the server answers both.
signtool sign /f certificate.pfx /p password /fd SHA256 /tr https://tsa.example.com/tsa/get.aspx /td SHA256 program.exe
signtool sign /f certificate.pfx /p password /fd SHA256 /t https://tsa.example.com/tsa/get.aspx program.exe
With PowerShell:
$cert = Get-PfxCertificate d:\cert.pfx
Set-AuthenticodeSignature -FilePath d:\script.ps1 -Certificate $cert -IncludeChain All -TimeStampServer "https://tsa.example.com/tsa/get.aspx"
To check that the script was time stamped, show the certificate of the time stamp server: (Get-AuthenticodeSignature d:\script.ps1).TimeStamperCertificate shows the certificate of your server. If the server requires authentication, add ?u=...&p=... to the address (PowerShell cannot send a user name for the time stamp server).
Macros of Microsoft Office are signed without a time stamp by default. To time stamp them, add the address of the server to the registry of the user who signs:
reg add "HKCU\Software\Microsoft\VBA\Security" /v "TimeStampURL" /f /d "https://tsa.example.com/tsa/get.aspx"
reg add "HKCU\Software\Microsoft\VBA\Security" /v "TimeStampRetryCount" /f /t REG_DWORD /d 2
reg add "HKCU\Software\Microsoft\VBA\Security" /v "TimeStampRetryDelay" /f /t REG_DWORD /d 1
14.4 Java (jarsigner)
jarsigner -keystore "d:\keystore.key" -storepass <keystore password> -tsa https://tsa.example.com/tsa/get.aspx "d:\lib.jar" <key alias>
jarsigner -verify "d:\lib.jar"
14.5 Signatures of Microsoft Office documents (XAdES-T)
Microsoft Office 2010 and 2013 create XAdES-EPES signatures by default. To create XAdES-T signatures, with a time stamp, set these values in the registry of the user (use the key 14.0 for Office 2010 and 15.0 for Office 2013):
Windows Registry Editor Version 5.00

[HKEY_CURRENT_USER\Software\Microsoft\Office\15.0\Common\Signatures]
"XAdESLevel"=dword:00000002
"MinXAdESLevel"=dword:00000001
"TSALocation"="https://tsa.example.com/tsa/get.aspx"XAdESLevel2 asks for XAdES-T.MinXAdESLevelis the minimum level that must be reached: with 1, Office falls back to XAdES-EPES when the time stamp server is not available; with 2 it shows an error instead.- Office requires that the time stamping certificate is trusted (section 14.1). Otherwise it shows a warning when the signature is applied.
14.6 Other programs
If you are a developer, section 15 has complete, ready-to-use guides for OpenSSL, PowerShell, C#, Java, Python and PHP, and for long-term signatures with the Signature Library.
Any program that uses the RFC 3161 protocol works: it sends the request with an HTTP POST, with the content type application/timestamp-query, and receives application/timestamp-reply. The options of a client correspond to the settings of the server:
| Option of the client program | Setting of the server |
|---|---|
| Use a nonce | Time Stamp Request must include a Nonce extension |
| Policy OID of the time stamp server | Time Stamp Server Policy ID and Time Stamp Request must include the current Time Stamp Server Policy ID |
| User name and password of the time stamp server | Require authentication and the users (section 11) |
| Hash algorithm of the request | Time Stamp Response Hash Algorithm |
| Ask for the certificate in the response | The server always includes the certificate when the request asks for it; Include whole chain adds the chain. |
15. Integration guides
This chapter is for developers and administrators who request time stamps from their own programs and scripts. Each guide is a short, complete example for one tool or one programming language: copy the code, put the address of your server in it and run it.
The same three steps in every guide
- Compute the hash and build the request. The program computes the SHA-256 hash of the file and puts it in an RFC 3161 time stamp request. The file never leaves your computer.
- Send the request to the server. An HTTP
POSTto the Time Stamp Server Address (section 5), with the content typeapplication/timestamp-query. The answer is the time stamp, saved as a.tsrfile. - Verify the time stamp. The program checks the
.tsragainst the original file, and the time of the time stamp is read from it.
- The address. The examples use
https://tsa.example.com/tsa/get.aspx. Replace it with the Time Stamp Server Address that the main page of your server shows. - Authentication. If the server requires authentication (section 11), add the credentials to the address,
https://tsa.example.com/tsa/get.aspx?u=user&p=password. The code does not change. Use this form only over HTTPS. - The certificate for the verification. The examples that check the certificate use the file
tsa.pem, the certificate of your server. DownloadTSACertificate.crtfrom the main page and convert it, as in section 13:openssl x509 -inform der -in TSACertificate.crt -out tsa.pem. For a time stamping certificate issued by a certification authority,tsa.pemmust also contain the certificates of the authority.
15.1 OpenSSL and curl (command line)
The quickest way to request and verify a time stamp for any file, from a terminal on Windows, Linux or macOS.
Step 1: build the request (.tsq). OpenSSL computes the hash of the file and creates the request. The option -cert asks the server to include its certificate in the response, so that the time stamp can be verified offline.
openssl ts -query -data document.pdf -sha256 -cert -out request.tsqStep 2: send it to the server. The content type must be application/timestamp-query. The answer is saved in response.tsr.
curl -H "Content-Type: application/timestamp-query" \
     --data-binary "@request.tsq" \
     https://tsa.example.com/tsa/get.aspx \
     -o response.tsr
Step 3: verify the time stamp (.tsr). OpenSSL checks the time stamp against the original file and the certificate of the server.
openssl ts -verify -data document.pdf \
     -in response.tsr \
     -CAfile tsa.pem
When the time stamp is valid and the file is intact, OpenSSL writes Verification: OK.
Optional: read the time stamp. This shows the time (UTC), the hash algorithm, the serial number and the name of the server:
openssl ts -reply -in response.tsr -text15.2 PowerShell
Request and verify RFC 3161 time stamps directly from PowerShell 7, with the .NET classes and without any other program. It fits scripts, deployment tasks and CI/CD pipelines.
Step 1: request the time stamp. The function computes the SHA-256 hash of the file, builds an Rfc3161TimestampRequest, sends it with Invoke-RestMethod and writes the answer to disk.
function Request-Rfc3161Timestamp {
    param (
        [Parameter(Mandatory = $true)]
        [string]$FilePath,

        [Parameter(Mandatory = $true)]
        [string]$OutputTsrPath,

        [Parameter(Mandatory = $true)]
        [string]$TsaUrl
    )

    # 1. Compute SHA-256 hash of the target file
    $fileBytes = [System.IO.File]::ReadAllBytes($FilePath)
    $hash = [System.Security.Cryptography.SHA256]::HashData($fileBytes)

    # 2. Build RFC 3161 request
    $hashAlgorithm = [System.Security.Cryptography.HashAlgorithmName]::SHA256
    $request = [System.Security.Cryptography.Pkcs.Rfc3161TimestampRequest]::CreateFromHash(
        $hash,
        $hashAlgorithm,
        $null,
        $true # Request TSA certificate in response
    )

    $encodedRequest = $request.Encode()

    # 3. Send HTTP POST request to the TSA endpoint
    $tsrBytes = Invoke-RestMethod -Uri $TsaUrl `
        -Method Post `
        -ContentType "application/timestamp-query" `
        -Body $encodedRequest `
        -ResponseHeadersVariable responseHeaders

    # 4. Save timestamp response (.tsr)
    [System.IO.File]::WriteAllBytes($OutputTsrPath, $tsrBytes)
    Write-Host "[SUCCESS] Timestamp saved to: $OutputTsrPath" -ForegroundColor Green
}
Step 2: verify the time stamp. The function reads the .tsr file, compares its hash with the hash of the original file and reads the signing time.
function Test-Rfc3161Timestamp {
    param (
        [Parameter(Mandatory = $true)]
        [string]$FilePath,

        [Parameter(Mandatory = $true)]
        [string]$TsrPath
    )

    # 1. Read original file and compute SHA-256 hash
    $fileBytes = [System.IO.File]::ReadAllBytes($FilePath)
    $hash = [System.Security.Cryptography.SHA256]::HashData($fileBytes)
    $tsrBytes = [System.IO.File]::ReadAllBytes($TsrPath)

    # 2. Parse RFC 3161 Timestamp Token
    $bytesRead = 0
    $token = [System.Security.Cryptography.Pkcs.Rfc3161TimestampToken]::ReadIfTimestampToken(
        $tsrBytes,
        [ref]$bytesRead
    )

    if ($null -eq $token) {
        Write-Error "[ERROR] Invalid timestamp token format."
        return $false
    }

    # 3. Verify hash integrity
    $hashAlgorithm = [System.Security.Cryptography.HashAlgorithmName]::SHA256
    $isHashValid = $token.VerifyHash($hash, $hashAlgorithm, [ref]$null)

    if ($isHashValid) {
        $signingTime = $token.AsSignedCms().SignerInfos[0].SigningTime
        Write-Host "[SUCCESS] Timestamp is valid! Signed at (UTC): $($signingTime.UtcDateTime)" -ForegroundColor Green
        return $true
    } else {
        Write-Error "[ERROR] File hash does not match timestamp imprint."
        return $false
    }
}
Run it:
$fileToSign = "document.pdf"
$tsrOutput  = "document.pdf.tsr"
$tsaUrl     = "https://tsa.example.com/tsa/get.aspx"

# 1. Request Timestamp Token
Request-Rfc3161Timestamp -FilePath $fileToSign -OutputTsrPath $tsrOutput -TsaUrl $tsaUrl

# 2. Verify Timestamp Token
$isValid = Test-Rfc3161Timestamp -FilePath $fileToSign -TsrPath $tsrOutput
Write-Host "Verification Result: $isValid"
15.3 C# .NET (native classes)
Since .NET 5 the namespace System.Security.Cryptography.Pkcs supports RFC 3161 directly, so the example needs no third-party package, and it avoids the size and the maintenance of an extra library.
Step 1: request the time stamp. The method computes the SHA-256 hash of the file, builds an Rfc3161TimestampRequest and sends it with an HTTP POST and the content type application/timestamp-query.
using System;
using System.IO;
using System.Net.Http;
using System.Net.Http.Headers;
using System.Security.Cryptography;
using System.Security.Cryptography.Pkcs;
using System.Threading.Tasks;

public class TimestampClient
{
    public static async Task RequestTimestampAsync(string filePath, string outputTsrPath, string tsaUrl)
    {
        // 1. Compute SHA-256 hash of the target file
        byte[] fileBytes = await File.ReadAllBytesAsync(filePath);
        byte[] hash = SHA256.HashData(fileBytes);

        // 2. Build RFC 3161 timestamp request
        Rfc3161TimestampRequest request = Rfc3161TimestampRequest.CreateFromHash(
            hash,
            HashAlgorithmName.SHA256,
            requestSignerCertificates: true
        );

        // 3. Send HTTP POST request to the TSA server
        using HttpClient client = new HttpClient();
        ByteArrayContent content = new ByteArrayContent(request.Encode());
        content.Headers.ContentType = new MediaTypeHeaderValue("application/timestamp-query");

        HttpResponseMessage response = await client.PostAsync(tsaUrl, content);
        response.EnsureSuccessStatusCode();

        // 4. Save timestamp response token (.tsr)
        byte[] tsrBytes = await response.Content.ReadAsByteArrayAsync();
        await File.WriteAllBytesAsync(outputTsrPath, tsrBytes);

        Console.WriteLine($"[SUCCESS] Timestamp saved to: {outputTsrPath}");
    }
}
Step 2: verify the time stamp. The method checks the .tsr against the hash of the original file.
using System;
using System.IO;
using System.Security.Cryptography;
using System.Security.Cryptography.Pkcs;

public class TimestampVerifier
{
    public static bool VerifyTimestamp(string filePath, string tsrPath)
    {
        byte[] fileBytes = File.ReadAllBytes(filePath);
        byte[] hash = SHA256.HashData(fileBytes);
        byte[] tsrBytes = File.ReadAllBytes(tsrPath);

        // Parse RFC 3161 Response
        Rfc3161TimestampToken token = Rfc3161TimestampToken.ReadIfTimestampToken(
            tsrBytes,
            out _,
            out _
        );

        if (token == null)
        {
            Console.WriteLine("[ERROR] Invalid timestamp token format.");
            return false;
        }

        // Verify hash integrity and timestamp signature
        bool isHashValid = token.VerifyHash(hash, HashAlgorithmName.SHA256, out _);

        if (isHashValid)
        {
            DateTimeOffset timestampTime = token.AsSignedCms().SignerInfos[0].SigningTime;
            Console.WriteLine($"[SUCCESS] Timestamp is valid! Signed at (UTC): {timestampTime.UtcDateTime}");
            return true;
        }

        Console.WriteLine("[ERROR] Hash mismatch or invalid signature.");
        return false;
    }
}
Run the whole workflow in a console application:
string fileToSign = "document.pdf";
string tsrOutput = "document.pdf.tsr";
string tsaServerUrl = "https://tsa.example.com/tsa/get.aspx";

// 1. Request Timestamp
await TimestampClient.RequestTimestampAsync(fileToSign, tsrOutput, tsaServerUrl);

// 2. Verify Timestamp
bool isValid = TimestampVerifier.VerifyTimestamp(fileToSign, tsrOutput);
Console.WriteLine($"Verification Result: {isValid}");
15.4 Java (BouncyCastle)
Request and verify time stamp tokens in Java with the BouncyCastle library.
Prerequisite. Add the BouncyCastle library to your pom.xml (Maven) or build.gradle:
<dependency>
    <groupId>org.bouncycastle</groupId>
    <artifactId>bcpkix-jdk18on</artifactId>
    <version>1.78.1</version>
</dependency>
Step 1: request the time stamp. The method computes the SHA-256 hash of the file, builds a TimeStampRequest and sends it with an HTTP POST and the media type application/timestamp-query.
import org.bouncycastle.asn1.ASN1ObjectIdentifier;
import org.bouncycastle.asn1.nist.NISTObjectIdentifiers;
import org.bouncycastle.tsp.*;

import java.io.*;
import java.net.HttpURLConnection;
import java.net.URL;
import java.nio.file.Files;
import java.security.MessageDigest;

public class JavaTimestampClient {

    public static void requestTimestamp(String filePath, String outputTsrPath, String tsaUrl) throws Exception {
        // 1. Compute SHA-256 hash of the target file
        byte[] fileBytes = Files.readAllBytes(new File(filePath).toPath());
        MessageDigest digest = MessageDigest.getInstance("SHA-256");
        byte[] hash = digest.digest(fileBytes);

        // 2. Build RFC 3161 TimeStampRequest
        TimeStampRequestBuilder requestBuilder = new TimeStampRequestBuilder();
        requestBuilder.setCertReq(true); // Request TSA certificate in response

        ASN1ObjectIdentifier hashAlgOid = NISTObjectIdentifiers.id_sha256;
        TimeStampRequest request = requestBuilder.build(hashAlgOid, hash);
        byte[] requestBytes = request.getEncoded();

        // 3. Send HTTP POST request to TSA Server
        URL url = new URL(tsaUrl);
        HttpURLConnection conn = (HttpURLConnection) url.openConnection();
        conn.setDoOutput(true);
        conn.setRequestMethod("POST");
        conn.setRequestProperty("Content-Type", "application/timestamp-query");

        try (OutputStream os = conn.getOutputStream()) {
            os.write(requestBytes);
            os.flush();
        }

        if (conn.getResponseCode() != HttpURLConnection.HTTP_OK) {
            throw new IOException("TSA Server responded with HTTP " + conn.getResponseCode());
        }

        // 4. Save response (.tsr) to disk
        try (InputStream is = conn.getInputStream();
             FileOutputStream fos = new FileOutputStream(outputTsrPath)) {
            byte[] buffer = new byte[4096];
            int bytesRead;
            while ((bytesRead = is.read(buffer)) != -1) {
                fos.write(buffer, 0, bytesRead);
            }
        }

        System.out.println("[SUCCESS] Timestamp saved to: " + outputTsrPath);
    }
}
Step 2: verify the time stamp. The method reads the .tsr file as a TimeStampResponse and compares the hash that it contains with the SHA-256 hash of the original file.
import org.bouncycastle.tsp.*;
import java.io.File;
import java.nio.file.Files;
import java.security.MessageDigest;
import java.util.Date;

public class JavaTimestampVerifier {

    public static boolean verifyTimestamp(String filePath, String tsrPath) throws Exception {
        // 1. Calculate SHA-256 hash of original file
        byte[] fileBytes = Files.readAllBytes(new File(filePath).toPath());
        MessageDigest digest = MessageDigest.getInstance("SHA-256");
        byte[] hash = digest.digest(fileBytes);

        // 2. Load TSR response
        byte[] tsrBytes = Files.readAllBytes(new File(tsrPath).toPath());
        TimeStampResponse response = new TimeStampResponse(tsrBytes);

        // Validate response status
        response.validate(null);
        TimeStampToken token = response.getTimeStampToken();

        if (token == null) {
            System.err.println("[ERROR] No timestamp token found in response.");
            return false;
        }

        // 3. Verify message imprint (hash matching)
        TimeStampTokenInfo info = token.getTimeStampInfo();
        byte[] tokenHash = info.getMessageImprintDigest();

        if (MessageDigest.isEqual(hash, tokenHash)) {
            Date signingTime = info.getGenTime();
            System.out.println("[SUCCESS] Timestamp signature is valid! Time (UTC): " + signingTime);
            return true;
        } else {
            System.err.println("[ERROR] File hash does not match timestamp imprint.");
            return false;
        }
    }
}
Run it from your application:
public class Main {
    public static void main(String[] args) {
        try {
            String fileToSign = "document.pdf";
            String tsrOutput = "document.pdf.tsr";
            String tsaUrl = "https://tsa.example.com/tsa/get.aspx";

            // 1. Request Timestamp
            JavaTimestampClient.requestTimestamp(fileToSign, tsrOutput, tsaUrl);

            // 2. Verify Timestamp
            boolean isValid = JavaTimestampVerifier.verifyTimestamp(fileToSign, tsrOutput);
            System.out.println("Verification Result: " + isValid);

        } catch (Exception e) {
            e.printStackTrace();
        }
    }
}setCertReq(true)With this call the server returns its signing certificate inside the time stamp, so that the time stamp can be verified offline.
15.5 Python (rfc3161ng)
Request, save and verify time stamps in Python with rfc3161ng, a library built on pyasn1 and cryptography that hides the ASN.1 and the HTTP details.
Prerequisite. Install the library:
pip install rfc3161ngStep 1: request and save the time stamp. The function reads the file, computes its SHA-256 digest, asks the server and writes the answer to disk.
import hashlib
import rfc3161ng

def request_timestamp(file_path: str, output_tsr_path: str, tsa_url: str):
    # 1. Read target file binary data
    with open(file_path, "rb") as f:
        file_data = f.read()

    # 2. Connect to TSA server and request RFC 3161 timestamp
    rt = rfc3161ng.RemoteTimestampingTest(tsa_url)

    # Compute SHA-256 hash and obtain timestamp response (.tsr)
    tsr_data = rt.timestamp(data=file_data, hashname="sha256")

    # 3. Save raw timestamp token to disk
    with open(output_tsr_path, "wb") as f:
        f.write(tsr_data)

    print(f"[SUCCESS] Timestamp saved to: {output_tsr_path}")
Step 2: verify the time stamp. The function reads the saved file and checks it against the SHA-256 hash of the original file.
import hashlib
import rfc3161ng

def verify_timestamp(file_path: str, tsr_path: str) -> bool:
    # 1. Read original file and compute SHA-256 digest
    with open(file_path, "rb") as f:
        file_data = f.read()

    # 2. Read saved timestamp response token (.tsr)
    with open(tsr_path, "rb") as f:
        tsr_data = f.read()

    # 3. Check hash integrity matching
    verified, signing_time = rfc3161ng.check_timestamp(
        tsr_data,
        data=file_data,
        hashname="sha256"
    )

    if verified:
        print(f"[SUCCESS] Timestamp is valid! Signed at (UTC): {signing_time}")
        return True
    else:
        print("[ERROR] Invalid timestamp or hash mismatch.")
        return False
Run the whole workflow in a script:
if __name__ == "__main__":
    file_to_sign = "document.pdf"
    tsr_output = "document.pdf.tsr"
    tsa_server_url = "https://tsa.example.com/tsa/get.aspx"

    # 1. Request Timestamp
    request_timestamp(file_to_sign, tsr_output, tsa_server_url)

    # 2. Verify Timestamp
    is_valid = verify_timestamp(file_to_sign, tsr_output)
    print(f"Verification Result: {is_valid}")
15.6 PHP (cURL and OpenSSL)
Add time stamps to a PHP application: a web application, an e-invoicing system or a PDF pipeline. The script builds the request with OpenSSL and sends it with cURL.
Step 1: request the time stamp. The function creates the RFC 3161 request with OpenSSL, sends the binary request with cURL and saves the answer.
<?php
function requestTimestamp($filePath, $outputTsrPath, $tsaUrl) {
    $tsqPath = $filePath . ".tsq";

    // 1. Generate RFC 3161 timestamp query using OpenSSL
    $cmd = "openssl ts -query -data " . escapeshellarg($filePath) . " -sha256 -cert -out " . escapeshellarg($tsqPath);
    exec($cmd, $output, $returnCode);

    if ($returnCode !== 0) {
        throw new Exception("Failed to generate OpenSSL timestamp query.");
    }

    // 2. Send binary query via cURL
    $tsqData = file_get_contents($tsqPath);
    $ch = curl_init($tsaUrl);

    curl_setopt($ch, CURLOPT_POST, true);
    curl_setopt($ch, CURLOPT_POSTFIELDS, $tsqData);
    curl_setopt($ch, CURLOPT_RETURNTRANSFER, true);
    curl_setopt($ch, CURLOPT_HTTPHEADER, [
        "Content-Type: application/timestamp-query"
    ]);

    $tsrData = curl_exec($ch);
    $httpCode = curl_getinfo($ch, CURLINFO_HTTP_CODE);
    curl_close($ch);

    // Clean up temporary query file
    unlink($tsqPath);

    if ($httpCode === 200 && $tsrData) {
        file_put_contents($outputTsrPath, $tsrData);
        echo "[SUCCESS] Timestamp response saved to: {$outputTsrPath}\n";
        return true;
    }

    throw new Exception("TSA Server responded with HTTP code: {$httpCode}");
}
Step 2: verify the time stamp. The function checks the .tsr against the original document with OpenSSL, using the certificate of the server.
function verifyTimestamp($filePath, $tsrPath, $caChainPath) {
    $cmd = "openssl ts -verify -data " . escapeshellarg($filePath) .
           " -in " . escapeshellarg($tsrPath) .
           " -CAfile " . escapeshellarg($caChainPath);

    exec($cmd, $output, $returnCode);

    if ($returnCode === 0) {
        echo "[SUCCESS] Timestamp is valid!\n";
        return true;
    }

    echo "[ERROR] Verification failed!\n";
    return false;
}
Run it in your PHP application:
$fileToSign = "document.pdf";
$tsrOutput  = "document.pdf.tsr";
$tsaUrl     = "https://tsa.example.com/tsa/get.aspx";
$caChain    = "tsa.pem";

// 1. Request Timestamp
requestTimestamp($fileToSign, $tsrOutput, $tsaUrl);

// 2. Verify Timestamp
verifyTimestamp($fileToSign, $tsrOutput, $caChain);
15.7 C# .NET: long-term signatures with SignLib
A signature that must stay verifiable for many years needs more than the signature itself. A long-term archival (LTA) signature carries a time stamp from your server, the validation data (the revocation information of the certificates) and archive time stamps, so it can be validated long after the certificate has expired. The Signature Library (SignLib) for .NET creates these signatures and asks the Time Stamp Server for the time stamps: https://www.signfiles.com/signature-library/
| Format | Use it for | Result |
|---|---|---|
| PAdES-LTA | PDF documents | The PDF file, signed, with the time stamp and the validation data embedded and protected for archiving. |
| CAdES-LTA | Any other file (Word documents, images, databases, archives) | A .p7m or .p7s file, with archive time stamps that protect the signature for decades. |
| XAdES-LTA | XML data: B2B exchanges, e-invoicing (UBL, CII), reports | The XML document, with the time stamp and the revocation data embedded in the XML tree. |
| ASiC-E LTA | Several files signed together | One ZIP-based container (.asice or .sce) with the files and their signatures. |
In all the examples, the certificate is loaded from the Windows store (a smart card, a token or an HSM can supply it), the property TimeStamping.ServerUrl points to your server and the property SignatureStandard selects the long-term format.
PAdES-LTA: PDF documents
Proves that the document was signed while the certificate was valid, and protects it for long-term archiving.
using System;
using SignLib.Pdf;
using SignLib.Certificates;

public void SignPdfPadesLta(string inputFile, string outputFile)
{
    PdfSignature pdf = new PdfSignature(inputFile, outputFile);

    // 1. Load the signing certificate (from Windows Store, Smart Card, or HSM)
    pdf.DigitalSignatureCertificate = DigitalCertificate.LoadFromCertificateStore();

    // 2. Configure the RFC 3161 time stamp server
    pdf.TimeStamping.ServerUrl = new Uri("https://tsa.example.com/tsa/get.aspx");

    // 3. Set Long-Term Archival (LTA) standard with embedded CRL/OCSP
    pdf.SignatureStandard = PdfSignatureStandard.PadesLTA;

    // 4. Apply the signature
    pdf.Sign();
}
CAdES-LTA: any file
For the files that are not PDF documents. The signature is saved as a standard .p7m (the file and the signature) or as a detached .p7s.
using System;
using SignLib.CAdES;
using SignLib.Certificates;

public void SignCadesLta(string inputFile, string outputFile)
{
    CadesSignature cades = new CadesSignature(inputFile, outputFile);

    // 1. Load the signing certificate
    cades.DigitalSignatureCertificate = DigitalCertificate.LoadFromCertificateStore();

    // 2. Set TSA for Long Term Archival timestamping
    cades.TimeStamping.ServerUrl = new Uri("https://tsa.example.com/tsa/get.aspx");

    // 3. Set CAdES-LTA (Archive) standard
    cades.SignatureStandard = CadesSignatureStandard.CadesLTA;

    // 4. Sign file (outputs standard .p7m or detached .p7s)
    cades.Sign();
}
XAdES-LTA: XML documents
The time stamp and the revocation data are embedded in the XML document itself.
using System;
using SignLib.XAdES;
using SignLib.Certificates;

public void SignXadesLta(string inputXml, string outputXml)
{
    XadesSignature xades = new XadesSignature(inputXml, outputXml);

    // 1. Load the signing certificate
    xades.DigitalSignatureCertificate = DigitalCertificate.LoadFromCertificateStore();

    // 2. Configure the RFC 3161 time stamp server
    xades.TimeStamping.ServerUrl = new Uri("https://tsa.example.com/tsa/get.aspx");

    // 3. Set XAdES-LTA (Archive) standard
    xades.SignatureStandard = XadesSignatureStandard.XadesLTA;

    // 4. Sign XML structure securely
    xades.Sign();
}
ASiC-E LTA: signature containers
An ASiC-E container binds one or more files and their signatures in a single ZIP-based file (.asice or .sce).
using System;
using SignLib.ASiC;
using SignLib.Certificates;

public void SignAsicELta(string inputFile, string outputAsice)
{
    AsicSignature asic = new AsicSignature(inputFile, outputAsice);

    // 1. Load the signing certificate
    asic.DigitalSignatureCertificate = DigitalCertificate.LoadFromCertificateStore();

    // 2. Configure the RFC 3161 time stamp server
    asic.TimeStamping.ServerUrl = new Uri("https://tsa.example.com/tsa/get.aspx");

    // 3. Set ASiC-E LTA (Archive) standard
    asic.SignatureStandard = AsicSignatureStandard.AsicELTA;

    // 4. Sign and generate ASiC-E container (.asice / .sce)
    asic.Sign();
}
15.8 PowerShell: long-term signatures with SignLib
The same long-term signatures, created from PowerShell with the Signature Library (SignLib) for .NET (https://www.signfiles.com/signature-library/): PAdES-LTA for PDF documents, CAdES for any file, and XAdES-LTA for XML documents. The signature is time stamped by your server through the property TimeStamping.ServerUrl.
Get-SigningCertificateandGet-FullPathare helper functions of the PowerShell samples of the library (the fileSignLibCommon.ps1). They get the signing certificate from a PFX file or from the Windows store, and the full path of a file.- The PowerShell scripts of the library load the .NET Framework build of SignLib, which runs in Windows PowerShell 5.1 (
powershell.exe), not in PowerShell 7.
PAdES-LTA: PDF documents
The property PadesLtvLevel selects the validation data that is embedded: here the OCSP responses of the certificate.
# PowerShell example for PAdES-LTA
$sign = New-Object SignLib.Pdf.PdfSignature
$sign.LoadPdfDocument([System.IO.File]::ReadAllBytes("document.pdf"))

# Set certificate from Windows store or Smart Card
$sign.DigitalSignatureCertificate = Get-SigningCertificate -Thumbprint "FAC4D3EF766A59BB068DD90877267EBC56B4232A"

# Configure RFC 3161 TSA Server
$sign.TimeStamping.ServerUrl = [Uri]"https://tsa.example.com/tsa/get.aspx"

# Apply PAdES-LTA standard
$sign.SignatureStandard = [SignLib.Pdf.PdfSignatureStandard]::PadesLTA
$sign.PadesLtvLevel = [SignLib.Pdf.PadesLtvLevel]::IncludeOcspOnly

# Save signed file
[System.IO.File]::WriteAllBytes("document_signed.pdf", $sign.ApplyDigitalSignature())
CAdES: any file
The signature is saved as a .p7m file. The level CadesA is the archiving level. The certificate comes from a PFX file here.
# PowerShell example for CAdES-A / CAdES-LTA
$sign = New-Object SignLib.Cades.CadesSignature
$sign.DigitalSignatureCertificate = Get-SigningCertificate -PfxFile "certificate.pfx" -PfxPassword "123456"

# Configure CAdES level (e.g., CadesA for archiving)
$sign.SignatureStandard = [SignLib.Cades.CadesSignatureStandard]::CadesA
$sign.TimeStamping.ServerUrl = [Uri]"https://tsa.example.com/tsa/get.aspx"

# Apply signature to file
[System.IO.File]::WriteAllBytes("document.p7m", $sign.ApplyDigitalSignature((Get-FullPath "document.pdf")))
XAdES-LTA: XML documents
For XML documents and e-invoicing.
# PowerShell example for XAdES-LTA
$sign = New-Object SignLib.Xml.XadesSignature
$sign.DigitalSignatureCertificate = Get-SigningCertificate -Thumbprint "FAC4D3EF766A59BB068DD90877267EBC56B4232A"

# Set XAdES-LTA standard and TSA server
$sign.SignatureStandard = [SignLib.Xml.XadesSignatureStandard]::XadesLTA
$sign.TimeStamping.ServerUrl = [Uri]"https://tsa.example.com/tsa/get.aspx"

# Apply XML signature
$sign.ApplyDigitalSignature((Get-FullPath "invoice.xml"), (Get-FullPath "invoice_signed.xml"))
16. Trial period and registration
A new installation works for a trial period of 45 days. The main page shows how many days remain (The trial version will expire in 45 days) and the buttons Register Now and Buy a license. During the trial the server is fully functional.
When the trial period ends and the server is not registered, it refuses every request with the text The trial version is expired. The administration pages still work, so you can register the server.
How to register
- Get a registration code. The code is delivered after the purchase. The button Buy a license opens the page where you can order it.
- Open the registration page. Press Register Now on the main page.
- Type the code exactly as you received it and press Register Now.
The registration page. A wrong code gives the message Invalid license key. - The page says The Time Stamp Server was succesfully registered. The main page now shows Registered Version and the messages about the registration disappear.
The registration is saved in the folder settings of the application. Keep this folder when you back up, move or upgrade the server (section 19).
17. Files and folders
The application folder contains the pages (*.aspx), Web.config, the folder bin (the program), the files of the web design (bootstrap.min.css and bootstrap.bundle.min.js) and the public certificate of the time stamp server (TSACertificate.crt, created when you select a certificate). The server keeps everything that is yours in the folder settings:
| File | Content |
|---|---|
config.sys | The settings and the choice of the certificate (the thumbprint, or the name of the PFX file and its password, or the library, the slot and the PIN of the PKCS#11 device). The content is encrypted. |
users.sys | The time stamp users, with the hash of their passwords, and their counters. Encrypted. |
admpswd.sys | The administrator account (the user name and the hash of the password). Encrypted. |
authentication.sys | A marker. When it exists, the administration pages ask for the login. It is created by Create Admin Account. |
authkey.sys, authlogout.sys | The data that make the login cookie of the administrator valid, and the time of the last logout. |
log.sys | The audit trail (section 12). A text file. |
responses_YYYY_M.sys | The log of the responses, one file for each month (section 12). |
certengine.sys | The counter of the responses and the start of the trial period. Do not delete it. |
tsaengine.sys | The registration of the server. |
invalidtime.sys | Optional. A marker that you create when the clock cannot be trusted (section 4). |
certs\ | The PFX files that the server created or received, and the .cer files of the PKCS#11 certificates, with random names. |
The Web.config of the application forbids the download of the settings folder and of the files with the extension .sys over HTTP. It also sets the size limit of the requests (64 KB for the time stamp service, 4 MB for Time Stamp a File, 2 MB for Verify, 512 KB for the other pages) and adds security headers to the answers.
18. Security recommendations
- Create the administrator account first (section 7), before the server is reachable from the network.
- Use HTTPS for the server (section 3.6). It protects the login of the administrator and the passwords of the time stamp users.
- Protect the folder of the application. The file
config.syscontains the PIN of the device or the password of the PFX file, and the foldersettingscontains the PFX files. Give access to the folder only to the account of the application pool and to the administrators, and treat the backups of the folder as you treat passwords. - Use an account with only the rights that are needed for the application pool (section 9.5). LocalSystem is useful to diagnose a problem; do not keep it.
- Do not put the password in the address (
?u=...&p=...) unless the client has no other way, and only over HTTPS. - The two test pages do not ask for the administrator login. Anybody who can reach the server can open Verify and Time Stamp a File From Your Computer. The second one time stamps the hash of the file that is sent, also when Require authentication is checked, and it does not count for any user. If the time stamps must be issued only to your users, hide this page in the
Web.configof the application, in the elementhiddenSegmentsthat already hides the foldersettings:
IIS then answers 404.8 Not Found for that page. The service (<hiddenSegments> <add segment="settings"/> <add segment="ApplyTimestamp.aspx"/> </hiddenSegments>get.aspx), the page Verify and the button Test Certificate are not affected. Add the line again if you replaceWeb.configduring an upgrade. - Limit the network that can open the administration pages, for example with the IP address restrictions of IIS, if the time stamp service is available to a wider network than the administrators.
- Keep the clock synchronized and watch it (section 4).
19. Backup, move and upgrade
Backup
Copy the whole application folder, and especially settings (settings, users, administrator account, PFX files, registration). The private key of a certificate that is in the Windows store or in a hardware device is not in this folder: back it up with the tools of Windows or of the device, if it can be backed up.
Move to another server
Install the application as in section 3, then copy the folder settings of the old server. Then:
- PFX file: nothing else to do. Press Test Certificate.
- Windows store: install the certificate and its key on the new server (the same store), give the account of the pool the right to use the key (section 8.5) and test.
- PKCS#11: install the software of the device, check the path of the library, the slot and the account of the pool (section 9), and press Test PKCS#11 Certificate.
Upgrade
The safest way is to install the new version in a new folder and a new application (for example D:\TSAServerNew and the alias tsanew), copy the folder settings and move the clients when the new server works. If you cannot do that:
- Make a backup of the application folder to another folder (for example
d:\TSAServerBackup). - Unpack the new version in a temporary folder.
- Copy the folder
binof the new version over the folderbinof the application. - Copy all the
*.aspxand*.configfiles of the new version over the files of the application. Do not touch the foldersettings. If you changedWeb.config(for example, to hide a page), make the change again. - Restart IIS and test the server (section 13).
20. Problems and solutions
The problems with the certificate of a hardware device have their own tables: section 8.5 (Windows store) and section 9.7 (PKCS#11).
| What you see | What to do |
|---|---|
| An error page, or no page, when you open the address of the application | Check ASP.NET 4.8, the .NET CLR version v4.0 and the Integrated pipeline of the pool, and the physical path of the application (section 3.7). |
| The login page appears again after a correct login | The cookie of the login is sent only over HTTPS. Open the server with an HTTPS address (section 7). |
| Invalid credentials. If you forgot the credentials, delete settings/admpswd.sys file from your server. | Wrong user name or password of the administrator. If you forgot them, delete settings\admpswd.sys and create the account again at once (section 7). |
| A red message on the main page that ends with Write access is mandatory for the Timestamp Server installation folder | Give the account of the application pool the Modify right on the folder (section 3.5). |
| The Timestamping certificate cannot be found. Please select or create the Timestamping certificate. | No certificate is selected yet, or the selected certificate is not available: select or create one (section 8). |
| The Timestaping certificate cannot be found on Microsoft Certificate Store. Please select a certificate. | The certificate that was selected is no longer in that store, or the account of the pool does not see that store. Check Current User and Local Machine (section 8.5). |
| No certificates was found on this certificate store. | The store is empty for the account of the application pool. Remember that Current User is the store of that account (section 8.5). |
| The selected certificate cannot be used for Timestamping: ... | The certificate does not have the extensions of a time stamping certificate (section 8.1). |
| PFX Timestamping certificate error: ... Error on PFX file: ... | The password of the PFX file is wrong, the file is damaged, or the saved PFX file was removed from settings\certs. Select the certificate again (section 8.4). |
| Time stamping test error: ... | The server could not sign with the certificate. The text gives the reason: section 8.5 for the keys of the Windows store and section 9.7 for PKCS#11. |
| The first part of the test succeeds and the second part reports a connection error | The second part of the test calls the address with which you opened the page. From the server, this address must be reachable and its HTTPS certificate accepted. Open the page with an address that the server can reach, for example the name of the server on the server itself. |
| Time Stamp Server configuration file read error. Rebuild the configuration file: ... | settings\config.sys cannot be read. Restore it from a backup, or delete it: the server then creates a new file with the default settings, and you must select the certificate and set the options again. |
| A client receives the text TSA Response error. instead of a time stamp | The server could not create the time stamp. Read the last lines of the audit trail or of settings\log.sys: the usual causes are a time stamping certificate that is not available, or a key that the account of the server cannot use (section 8.5). |
| A client reports a response with the status Rejected | See the texts in section 11 (credentials, quota, nonce, policy), section 4 (clock) and section 16 (trial). |
| The program that verifies the time stamp says unverified or not trusted | Install the certificate of the server (or of its certification authority) as a trusted root on that computer (section 14.1). |
404.8 Not Found for ApplyTimestamp.aspx | The page was hidden in Web.config (section 18). |
| The audit page says Log file was not found. | No event was recorded yet. |
| The counters of the users, or the log of the responses, are a few entries behind | They are written in groups (section 11 and section 12). It is not a fault. |
| The time of the time stamps is not correct | Synchronize the clock of the server (section 4). |
If you contact the technical support, send: the version of the server (main page), the exact text of the message and a picture of the page, the last lines of settings\log.sys, the account and the bitness of the application pool, and, for a hardware device, the manufacturer and the model, the path of the library and the result of the test.
21. Glossary
| Term | In plain words |
|---|---|
| Time stamp | A proof, signed by a time stamping authority, that a piece of data existed at a given time. |
| TSA (Time Stamping Authority) | The service that issues time stamps. TSA Server is a TSA. |
| Hash | A short fingerprint of data. If the data changes, the hash changes. Only the hash is sent to the server. |
| RFC 3161 | The standard protocol of the time stamp services. |
| Authenticode time stamp | The older time stamp protocol of the Windows code signing tools. The server answers it at the same address. |
| Nonce | A random number put in the request and returned in the response, to detect a replayed response. |
| Policy ID | An identifier (OID) of the policy under which the time stamp is issued. |
| Time stamping certificate | The certificate of the server, with the extended key usage Time Stamping (critical) as its only purpose. Its key signs the time stamps. |
| Extended Key Usage | The extension of a certificate that lists what the certificate can be used for. |
| PFX / P12 | A file that holds a certificate and its private key, protected by a password. |
| Certificate store | The place where Windows keeps certificates. Current User is the store of an account; Local Machine is the store of the computer. |
| Thumbprint | The hash of a certificate. It identifies a certificate in a store. |
| Application pool, identity | The IIS process in which the server runs, and the Windows account under which it runs. The rights of the server are the rights of this account. |
| IIS_IUSRS | A local group of Windows to which the accounts of the application pools belong. |
| HSM | Hardware Security Module: a device that keeps private keys and signs inside it. The key never leaves it. |
| PKCS#11 | The standard way for a program to use the keys of an HSM, of a smart card or of a token, through a library of the manufacturer. |
| Slot | In PKCS#11, a place where a device (or a partition of an HSM) is connected. |
| PIN | The secret that the server uses to log in to the device as its normal user. |
| Middleware | The software that comes with a smart card or a token and lets programs use it. |
| CNG, CSP, KSP | The components of Windows that manage private keys: Cryptographic Service Provider (older) and Key Storage Provider (CNG, newer). |
| Root certificate | The certificate at the top of a chain. A computer trusts a certificate when it trusts the root of its chain. |
22. Warning and disclaimer, trademarks
Every effort has been made to make this manual as complete and accurate as possible, but no warranty or fitness is implied. The information provided is on an “as is” basis. The author shall have neither liability nor responsibility to any person or entity with respect to any loss or damages arising from the information contained in this manual. The certificates that the software creates are test certificates and must be used only for testing the software.
.NET, Windows, Windows Server, IIS, Authenticode, PowerShell, signtool and Microsoft Office are trademarks of Microsoft Corporation. Adobe and Acrobat are trademarks of Adobe Inc. Java is a trademark of Oracle and/or its affiliates. All other trademarks are the property of their respective owners.